Take an example where we are scheduling a pod to one of 4 nodes. The following
definition files create a pod named “simple-webapp-color” with resource needs and a priority class called “high-priority.” The priority class, defined in a definition file, has a numeric value, helping the pod indicate its importance for scheduling in the Kubernetes cluster.
pod-definition.yaml
apiVersion: v1
kind: Pod
metadata:
  name: simple-webapp-color
spec:
  priorityClassName: high-priority
  containers:
  - name: simple-webapp-color
    description: "This priority class should be used for XYZ service pods only"
    image: simple-webapp-color
    resources:
      requests:
        memory: 1Gi
        cpu: "10"
priority-definition.yaml
apiVersion: scheduling.k8s.io/v1
kind: PriorityClass
metadata:
  name: high-priority
spec:
  value: 1000000
  globalDefault: false
This pod requires 10 CPU, and there are other pods waiting to be scheduled. There are 4 available nodes with varying resource availability. The following nodes have the available CPU
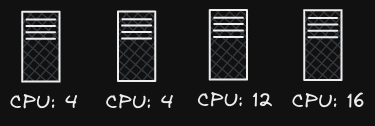
The first thing that happens is that all of the pods go into a scheduling queue. They are then sorted by priority, which is defined in the pod definition. In this case, the priority is very high (1 million).

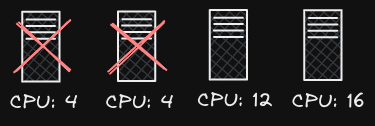
Next, the pod with highest priority in the scheduling queue is chosen to go to the filtering stage, where the scheduler will filter out the nodes with insufficient resources. The first two nodes don’t have sufficient space, so they are eliminated as options to put the pod on.

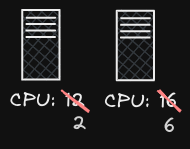
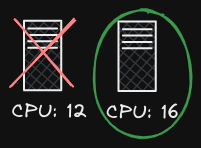
Next, the scheduler associates a score to each node remaining, and picks the node with the highest score. The node’s score can depend on a number of factors, in this case we will say that the score is based on the amount of cpu that would be left over if the pod were scheduled on it, which would be 2 and 6. Therefore, the node with 16 cpu is chosen.

 Finally, in the binding phase, the pod is bound to the node with the highest score.

Each stage of the scheduling process is made possible with plugins and extension points.
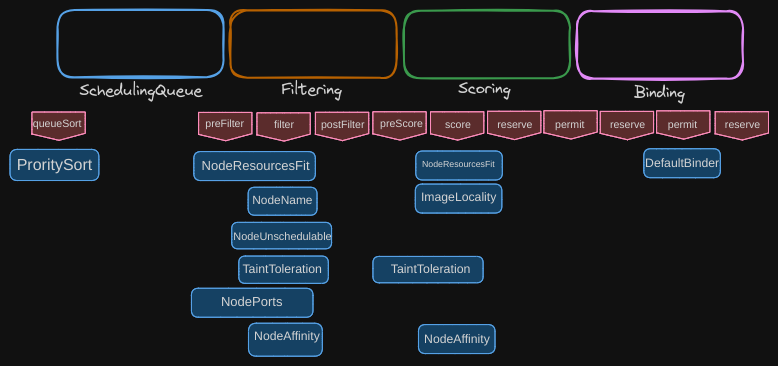 Some examples of plugins:
- PrioritySort: sorts pods in an order based on priority
- NodeResourcesFit: identifies nodes with sufficient resources
- NodeName: checks if a pod has a node name mentioned in the pod’s spec
- NodeUnschedulable: filters out nodes that have the unschedulable flag set to true
- NodeResourcesFit: is also used in the scoring phase of the scheduling process to associate scores to each node
- Plugins can be used at multiple stages of the scheduling process
- ImageLocality: associates a higher score to the nodes that already have the container image used by the pods among different nodes
- Note that at this stage, the plugins do not really reject the pod placement on a particular node. In the case of the image locality plugin, it ensures pods are placed on a node with the image, but if there are no nodes available, it will place the pod on a node that does not have the image.
- DefaultBinder binds the pods to a node.
Kubernetes makes it possible to write your own plugins and decide in the scheduling process where you want to execute them. This is made possible with extension points.
- At each stage, there is an extension point to which a plugin can be plugged into.
- Some plugins span across multiple extension points, while some are specific to one particular extension point.
Refer to Plugins and Extension Points here: https://kubernetes.io/docs/reference/scheduling/config/
Recall that you can define multiple scheduler profiles in a scheduler configuration definition file. How do you configure scheduler profiles to behave differently?
custom-scheduler-config.yaml ![Scheduler Profiles] Since 1.18 release of K8s, you can configure multiple profiles per scheduler.
- To configure them to work differently, you can configure the plugins to work the way you want them to.
- For the score section of the custom-scheduler-2 profile, the taint toleration plugin is being disabled and custom plugins are enabled.
- For the custom-scheduler-3 profile, all plugins in the prescore and score sections are disabled.