A certificate is used to guarantee trust between two parties during a transaction. For example, in a Kubernetes environment, TLS certificates ensure that the communication between K8s components, such as the Kube API server, nodes, and controllers, is encrypted and that each component is authenticated to ensure the integrity of the cluster.
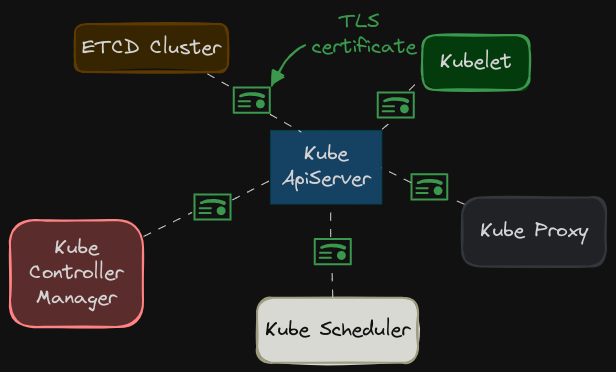
Let’s look at a simpler example to start with. When a user tries to access a web server, TLS certificates ensure that the communication between the user and the server is encrypted and the server is who it says it is.
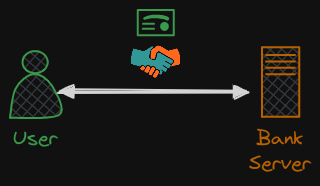
Without secure connectivity, if a user were to access their online banking application, the credentials they type in would be sent in a plain text format. A hacker sniffing network traffic could easily retrieve the credentials and use it to hack into the user’s bank account.
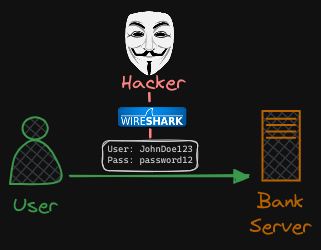
Well, that’s obviously not safe, so you must encrypt the data being transferred using encryption keys. For now, think of an encryption key as a string of random numbers and letters that scramble the message before the data is sent to the server.
The hacker sniffing the network gets the data, but can’t do anything with it. However, the same is the case with the server receiving the data. It cannot decrypt the data without the key, so a copy of the key must also be sent to the server so that the server can decrypt and read the message.
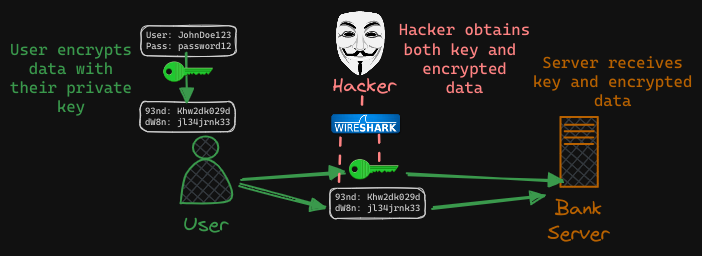 This is referred to as symmetric encryption. Since symmetric encryption employs a single key for both encryption and decryption, and this key must be shared between the sender and receiver over the same network, there exists a vulnerability wherein a hacker could intercept and exploit this key to decrypt the data.
Asymmetric Encryption
Instead of relying on a single key for both encryption and decryption, asymmetric encryption employs a pair of keys known as a private key and a public key. We can simplify this concept by thinking of it this way:
- The private key is like a unique key that only the owner possesses. The private key must be kept secure and never shared!
- The public key is like a lock accessible to everyone. When data is encrypted with this lock, it can only be unlocked using the corresponding private key.
One widely used method for asymmetric encryption is RSA. RSA leverages the computational speed of computers in multiplying prime numbers while exploiting the computer’s difficulty to do rapid division. Understanding RSA requires understanding some complex math, so it will not be covered in this post.
- Just know that data is locked using the public lock (public key), only the private key holder can unlock it.
Generating Keys
Imagine you need access to a server in your environment but want to avoid the risks associated with passwords. Instead, you opt for key pairs. You generate a set of keys: a private key (ID_RSA) and a public lock (ID_RSA.pub) using $ ssh-keygen
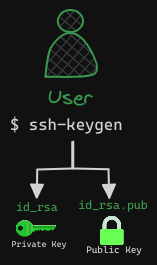
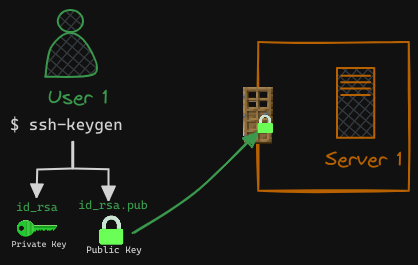
Next, you restrict access to the server, allowing entry only through a door secured with your public lock. This is typically achieved by adding your public key to the server’s authorized_keys file.
In this setup, while the lock is publicly accessible and could be tampered with, as long as your private key remains safely stored on your laptop, unauthorized access to the server is prevented. When you attempt to SSH into the server, you specify the location of your private key in the SSH command.
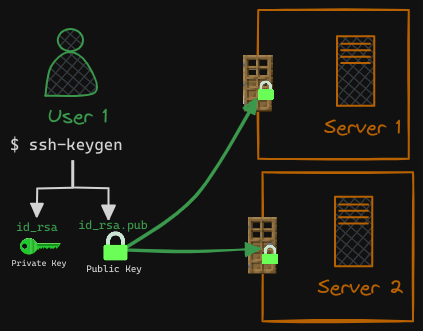
What if you have other servers in your environment? How do you secure more than one server with your key pair? Well, you can create copies of your public lock and place them on as many servers as you want. You can use the same private key to SSH into all of your servers securely.
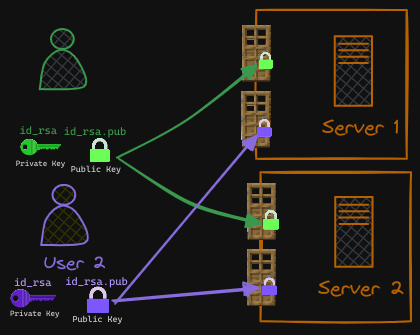
If other users need access to your servers, they can do the same thing. They can generate their own public and private key pairs. As the only person who has access to those servers, the users can create an additional “door” for them and lock it with their public keys (locks), copy their public keys to all the servers, and now the other users can access the servers using their private keys.
Let’s revisit our web server bank scenario. Earlier, we encountered an issue with symmetric encryption. The challenge lay in transmitting the encryption key alongside the encrypted data over the network, posing a risk of interception by hackers.
Now, consider an alternative: what if we could securely deliver the encryption key to the server? Once the key safely reaches the server, both the server and client can maintain secure communication through symmetric encryption. This is where asymmetric encryption comes into play, to facilitate the secure transfer of the symmetric key from the client to the server.
To implement this, we generate a pair of public and private keys on the server. From here on, we’ll refer to the public key as simply the “public key.” It’s worth noting that while we previously used the SSH key generation command for SSH purposes, the format differs slightly in this context.
Here we use the open SSL command to generate a private and public key pair.
- Here’s the private key:
$ openssl genrsa -out bank.key 1024

$ cat bank.key
-----BEGIN PRIVATE KEY-----
MIICdwIBADANBgkqhkiG9w0BAQEFAASCAmEwggJdAgEAAoGBANWTE5DTIeaoJJCJ
ZJEr05zf7h/j2X+q+O6eyuLBEOHCWhwFeIUJ27dwdOOYYQeuxZxg4GfadwzB54v1
rfBtNulNn3x00U2IepE92M2stu4g8CpCHcW3g2ylvikd06vX4bMZNiLwSBhqhakX
Vg/j4QaV3eujm6cVj9O7LH7faSvtAgMBAAECgYEAhEUOPQdFW6CO5KTyj6Xg7KsS
wtVOAm9UtBPL+xsu5WKEhA4vUdWFKdqPydS5YxSudebZk/gM+u2sBVYmX1yEQF8p
rey127offj9VeJiQbsemEeswyhaZWhiHiKZrtQBsNzA5esigV9FzdGclBcfzKSAa
LeuAmXWc6zT6TgTBiVECQQD3Qy1bnNIPagieQP0LA2Cr2b05Ck04Jz+wcX9ms3bQ
jTuT76JHs/jP/DTdK6t77bLJkrXARiFbS2zFDncyl5SPAkEA3R8ljmVMRPI0t/3K
o7aVji9rCM6C68Xuh4re3Fyb/OcTaJxjh+Mc8Xspoi0i57RzFjgzQOsTGQNH14ey
J3xNwwJBAKxrh8GOhVyCUCgqoUmAvXSYjT6tVFOH6v2a54AyPPQIyDbMr5jYgvRl
pmdkAFyW0EmHqH2/aZtD6UEwaSY6VTkCQGW4/2j7dtO87L271i3sP+7SJ5Y8koPu
YWYfX5jWTbhRgV89mpgXxefdNfDyfL1FCTCul/2EZxu5o6ImPbHmgEsCQFWSFzcz
e1z9SQqpLeW3HC82KgYiYgZTQk1D3sxqPOx1IibsOl5hAfaccSHjbbJg6FOyC9CU
tK+JkYeLRQ0g8Jc=
-----END PRIVATE KEY-----
And here’s the public key. Notice how the private key is being used as an argument in the openssl command. Essentially what is happening here is that openssl generates the public key from the private key.
- --pubout: This option instructs OpenSSL to output the public key corresponding to the input private key.
- It may or may not be obvious at this point, but be sure not to share the private key with ANYONE! These keys were never used for anything except for this demonstration and have since been deleted.
$ openssl rsa -in bank.key -pubout > bank-key.pem
writing RSA key

$ cat bank-key.pem
-----BEGIN PUBLIC KEY-----
MIGfMA0GCSqGSIb3DQEBAQUAA4GNADCBiQKBgQDVkxOQ0yHmqCSQiWSRK9Oc3+4f
49l/qvjunsriwRDhwlocBXiFCdu3cHTjmGEHrsWcYOBn2ncMweeL9a3wbTbpTZ98
dNFNiHqRPdjNrLbuIPAqQh3Ft4Nspb4pHdOr1+GzGTYi8EgYaoWpF1YP4+EGld3r
o5unFY/Tuyx+32kr7QIDAQAB
-----END PUBLIC KEY-----
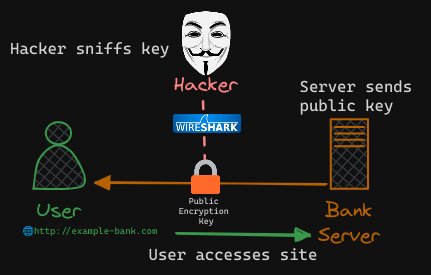
When the user first accesses the web server using HTTPS, he gets the public key from the server. Since the hacker is sniffing all traffic, let us assume he too gets a copy of the public key. We’ll see what he can do with it.
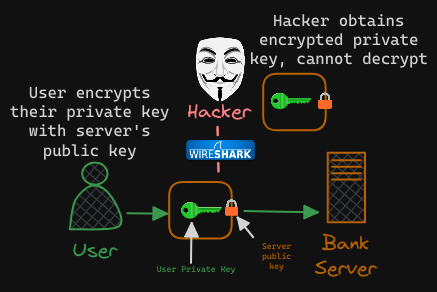
The user’s web browser then encrypts the symmetric key (the user’s private key) using the public key provided by the server. The most important thing to note about this exchange is that this public key can ONLY be decrypted using the server’s corresponding private key. The symmetric key is now secure. The user then sends this to the server. The hacker also gets a copy.
The server uses the private key to decrypt the message and retrieve the symmetry key from it. However, the hacker does not have the private key to decrypt and retrieve the symmetric key from the message it received. The hacker only has the public key with which he can only lock or encrypt a message and not decrypt the message.
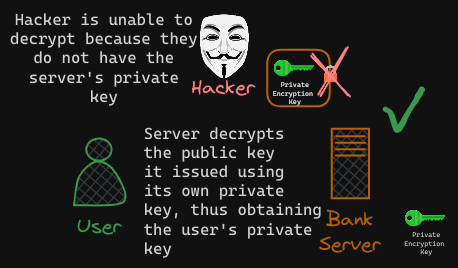
The symmetric key is now safely available only to the user and the server. They can now use the symmetric key to encrypt data and send to each other. The receiver can use the same symmetric key to decrypt data and retrieve information. The hacker is left with the encrypted messages and public keys with which he can’t decrypt any data.
Certificates
With asymmetric encryption, we’ve securely transferred the symmetric keys from the user to the server, so the client and server can now communicate encrypted and secure. This means symmetric encryption can be used to securely send data between the two.
However, the hacker seeks new ways to breach your account security. They recognize that the only viable method to obtain your credentials is by tricking you into entering them into a form they provide.
- The hacker proceeds to craft a website mirroring your bank’s interface entirely. From design to graphics, it’s an exact replica hosted on their server.
- To foster a false sense of security, they generate their own set of public and private key pairs, configuring them on the fraudulent web server.
- Additionally, they manipulate your environment or network to redirect requests intended for your bank’s website to their servers.
Now, the same exact asymmetric process we described above is taking place, except this time between the user and hacker!
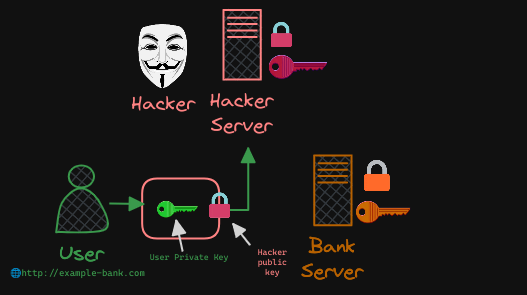
So how can you be sure that you are communicating with the REAL bank server, and more specifically, how can you verify if the key received from the server is legitimate and from the real bank server?
Instead of sending the public key directly, the server transmits a certificate containing the public key:
Certificate:
    Data:
        Version: 3
        Serial Number: 123456
    Signature Algorithm: sha256WithRSAEncryption
        Issuer: CN=Example Bank CA, O=Example Bank, Inc., C=US
        Validity
            Not Before: Feb 22 2024
            Not After : Feb 22 2025
        Subject: CN=example-bank.com, O=Example Bank, Inc., C=US
        Subject Public Key Info:
            Public Key Algorithm: rsaEncryption
                Public-Key: (2048 bit)
        X509v3 extensions:
            Basic Constraints: critical CA:FALSE
    Signature Algorithm: sha256WithRSAEncryption
You’ll notice the certificate has names on it in the “Subject” field. The name of person or subject to whom the certificate is issued to is very important as that is the field that helps you validate their identity. If this is for a web server, this must match what the user types in in the URL on his browser.
- If the bank is known by any other names, and if they’d like their users to access their application with the other names as well, then all those names should be specified in this certificate under the subject as native name section.
The problem though, is anyone can generate a certificate like this. You could generate one for yourself saying you are the bank’s website, and that’s what the hacker did in this case.
So again, how do you look at a certificate and verify if it is legitimate? The question is: who signed and issued the certificate?
- If you generate a certificate then you have to sign it by yourself. That is known as a self-signed certificate.
- Anyone looking at the certificate generated by the hacker, you will immediately know that it is not a safe certificate because it was signed by them.
- All web browsers are built in with a certificate validation mechanism while in the browser checks the certificate received from the server and validates it to make sure it is legitimate.
- If it identifies it to be a fake certificate, then it actually warns you. You’ve likely seen this before if you’ve clicked on a sketchy link:
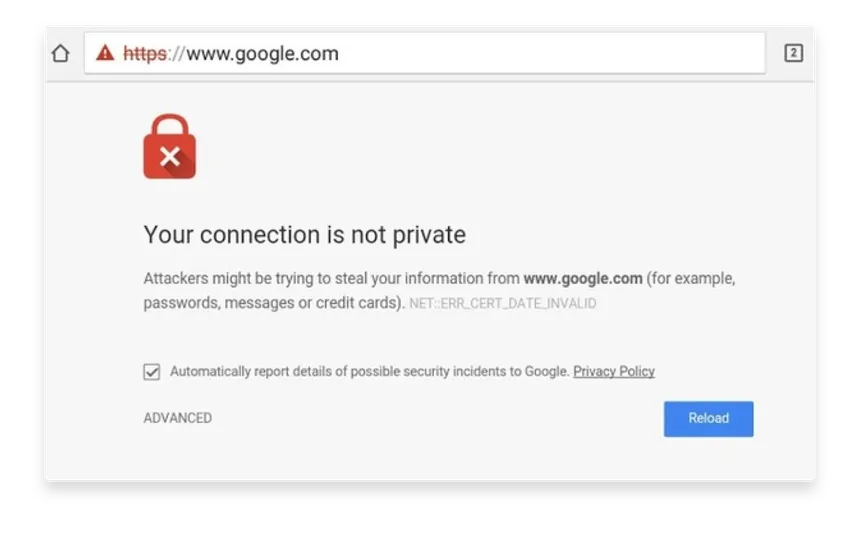 The question still remains: How do you create a legitimate certificate for your web servers that the web browsers will trust? How do you get your certificates signed by someone with authority? That’s where certificate authorities or CAs come in.
Certificate Authorities
Certificate Authorities are well known organizations that can sign and validate your certificates for you. Some of the popular ones are Symantec, DigiCert, Comodo, GlobalSign, etc.
- The way this works is by generating a Certificate Signing Request (CSR) using the key you generated earlier (bank.key) and the domain name of your website. You can do this using this
opensslcommand:$ openssl req -new -key bank.key -out bank.csr -subj "/C=US/ST=CA/O=MyOrg, Inc./CN=mydomain.com" - The command’s arguments are the following:
-subj "/C=US/ST=CA/O=MyOrg, Inc./CN=mydomain.com": This option specifies the subject information for the certificate. It provides the details that will be included in the CSR:/C=US: Country Name (C) - Specifies the two-letter ISO country code (e.g., US for United States)./ST=CA: State or Province Name (ST) - Specifies the state or province (e.g., CA for California)./O=MyOrg, Inc.: Organization Name (O) - Specifies the organization or company name (e.g., MyOrg, Inc.)./CN=mydomain.com: Common Name (CN) - Specifies the fully qualified domain name (FQDN) for the certificate (e.g., mydomain.com). This typically represents the domain name of the entity (e.g., a website) for which the certificate is being requested.
- The command ultimately generates a bank.csr file, which is the Certificate Signing Request (CSR) that should be sent to the Certificate Authority (CA) for signing.
- The certificate authorities verify your details and once it checks out, they sign the certificate and send it back to you.
- This is what the CSR looks like:
  -----BEGIN CERTIFICATE REQUEST-----
MIICwDCCAagCAQAwgY8xCzAJBgNVBAYTAlVTMQswCQYDVQQIDAJDQTEWMBQGA1UE
...
...
NvdXJzZUBleGFtcGxlLmNvbTCCASIwDQYJKoZIhvcNAQEBBQADggEPADCCAQoC
ggEBAM9rPvg4yIAwLgCNXGvSLyS9Kd1kwXJ2+/gp/dv2WlvF7W8GOpHvrdiLEdC
8lGi53yFCF8OHYIolB1x5vCCXqHtJp+rOnufgH+afjX
-----END CERTIFICATE REQUEST-----
You now have a certificate signed by a CA that the browsers trust. If hacker tried to get his certificate signed the same way, he would fail during the validation phase and his certificate would be rejected by the CA. So the website that he’s hosting won’t have a valid certificate.
CAs use different techniques to make sure that you are the actual owner of that domain. You now have a certificate signed by a CA that the browsers trust, but how do the browsers know that the CA itself was legitimate?
- For example, how would the browser know Symantec is a valid CA and that the certificate was in fact signed by Symantec and not by someone who says they are Symantec?
We showed before in the examples above that using asymmetric encryption can solve the problem of safely transferring private keys. The CAs themselves have a set of public and private key pairs.
- The CAs use their private keys to sign the certificates.
- The public keys of all the CAs are built in to the browsers, and the browser uses the public key of the CA to validate that the certificate was actually signed by the CA themselves.
- You can actually see them in the settings of your web browser under certificates, they’re under trusted CAs tab.
Now, these are public CAs that help us ensure the public websites we visit, like our banks, emails, etc, are legitimate. However, they don’t help you validate sites hosted privately, say within your organization. For example, for accessing your payroll or internal email applications.
- For that, you can host your own private CAs. Most of these companies such as Symantec, DigiCert, Comodo, GlobalSign, etc have a private offering of their services, a CA server that you can deploy internally within your company.
- You can then have the public key of your internal CAs server installed on all your employees browsers and establish secure connectivity within your organization.
A very important thing to note going forward: We have been using the analogy of a key and lock for private and public keys. This analogy has been helpful for understanding the general function of what public and private keys are used for, but these are, in fact, two related or paired keys.
- You can encrypt data with any one of them and only decrypt data with the other. You cannot encrypt data with one and decrypt with the same. So you must be careful what you encrypt your data with.
- If you encrypt your data with your private key, then remember anyone with your public key, which could really be anyone out there, will be able to decrypt and read your message.
So let’s summarize real quick. We have seen why you may want to encrypt messages being sent over a network. To encrypt messages, we use asymmetric encryption with a pair of public and private keys. An admin uses a pair of keys to secure SSH connectivity to the servers.
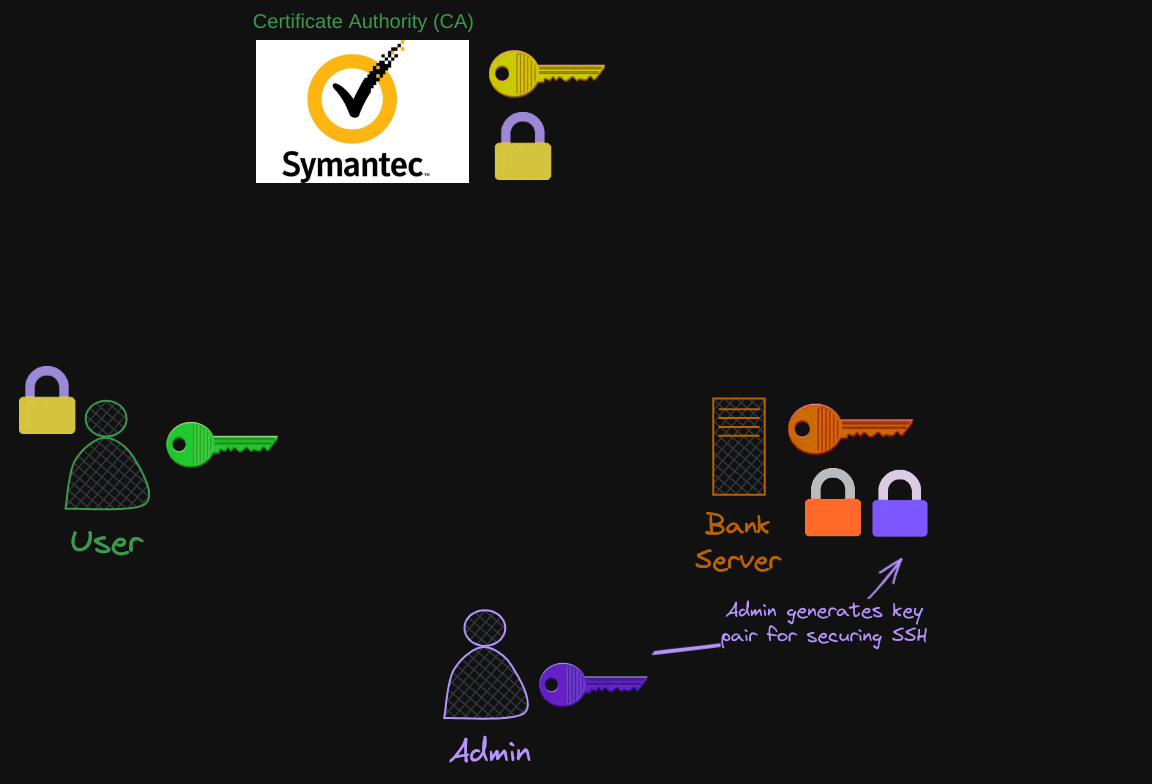
The server uses a pair of keys to secure HTTPS traffic. But for this, the server first sends a certificate signing request to a CA. Remember that the CSR contains information given by the $ openssl req -new -key bank.key -out bank.csr -subj "/C=US/ST=CA/O=MyOrg, Inc./CN=mydomain.com" command, namely the public key, along with other identifying details such as the country (C), state (ST), organization (O), and common name (CN) associated with the entity requesting the certificate.
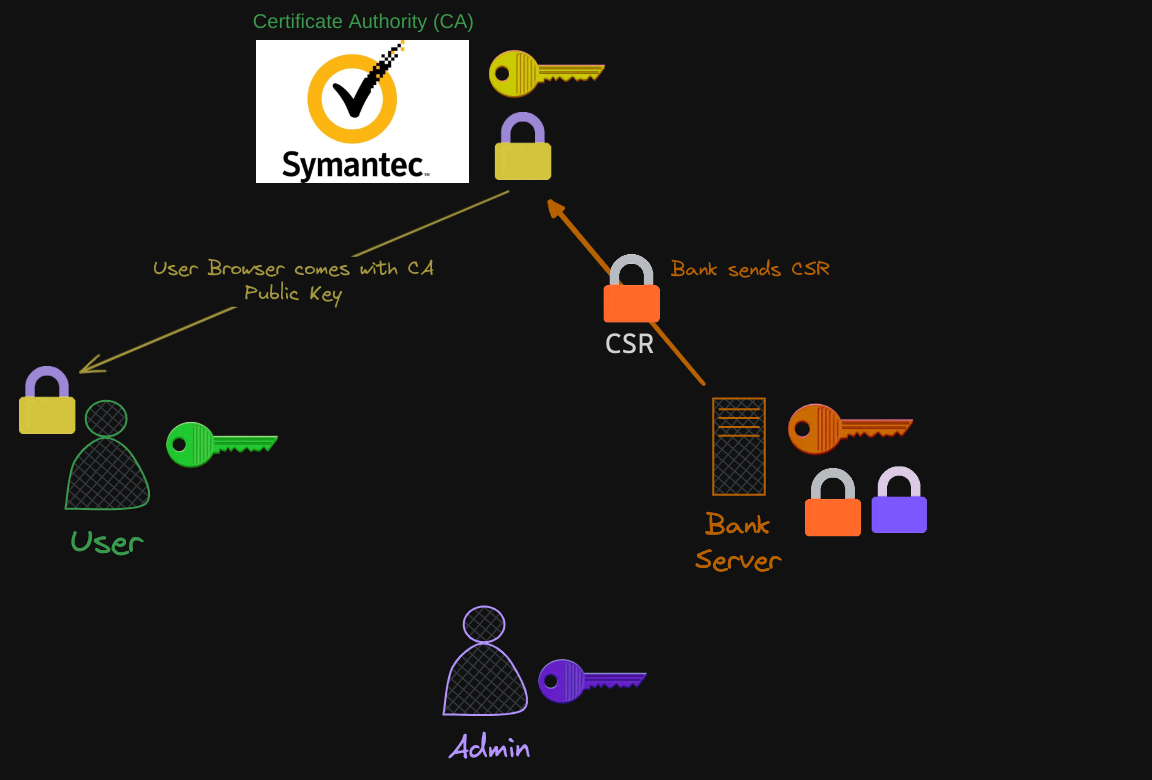
The CA uses its private key to sign the CSR. Remember, all users have a copy of the CA’s public key.
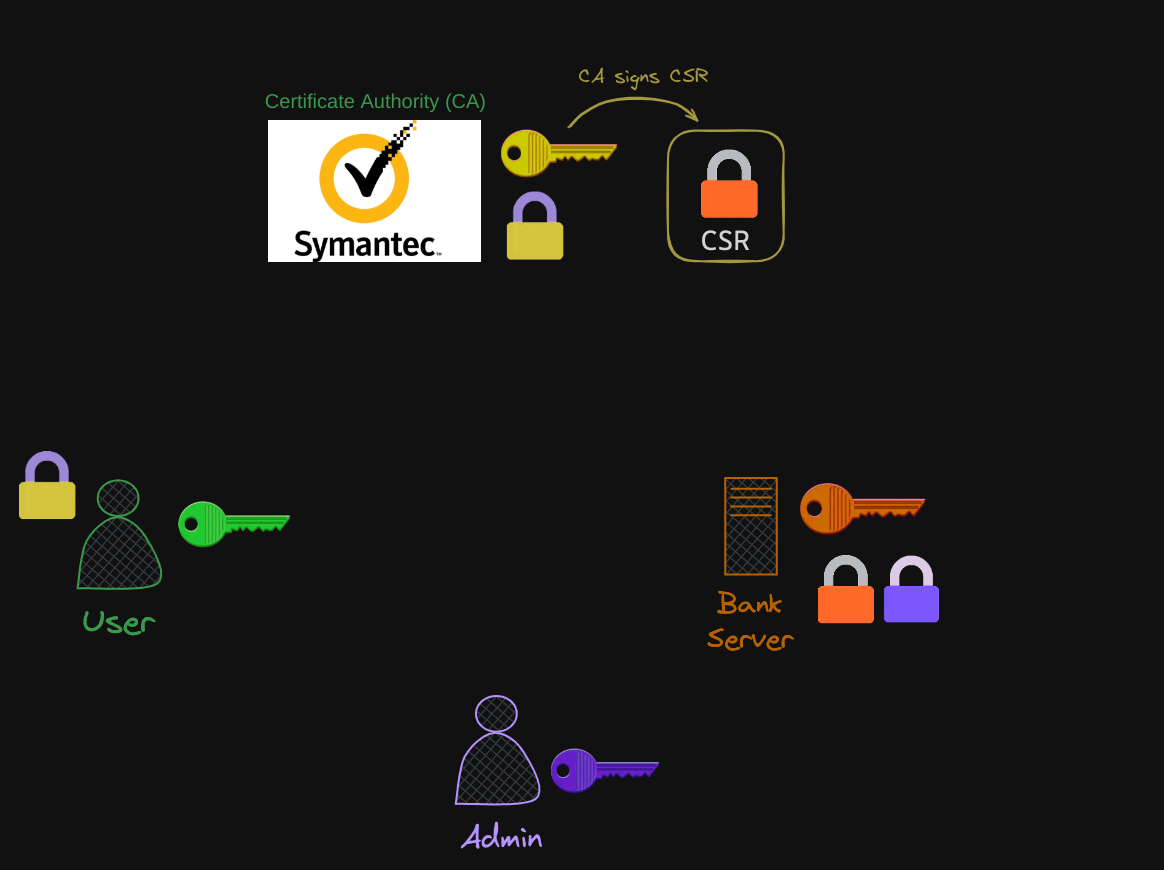
The signed certificate is then sent back to the server. The server configures the web application with the signed certificate.
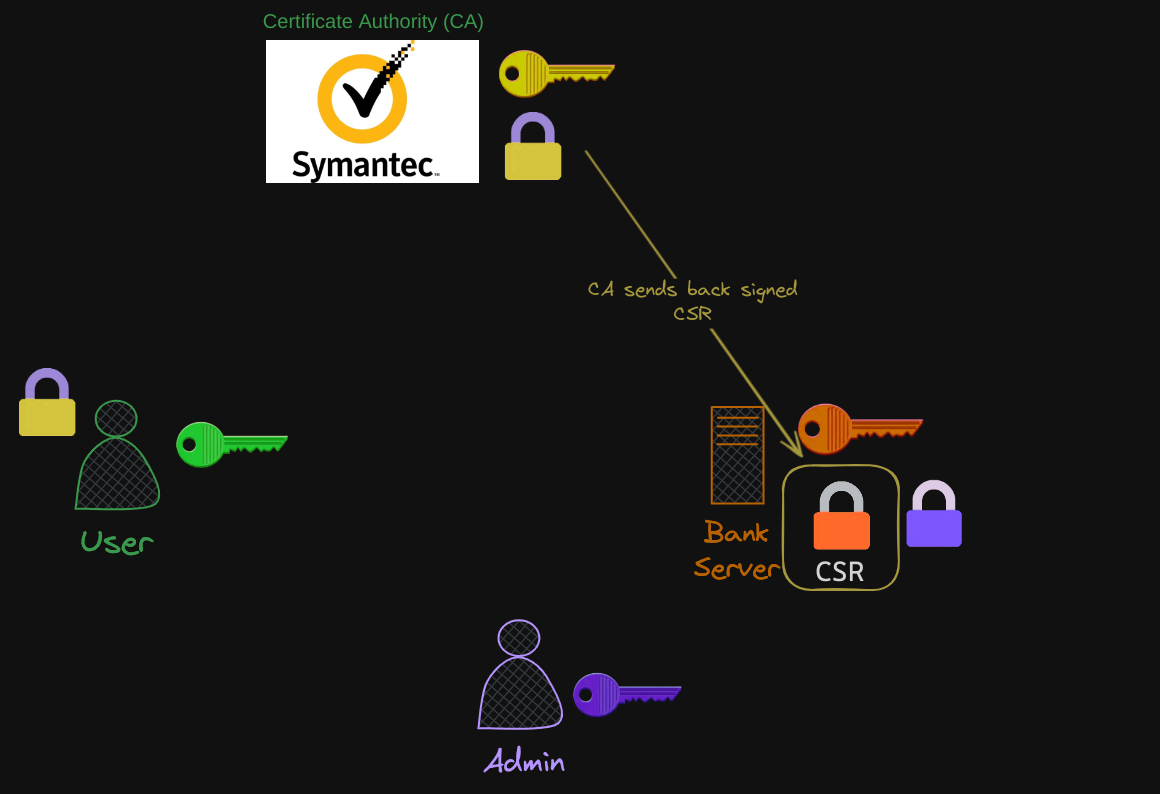
Whenever a user accesses the web application, the server first sends the certificate with its public key.
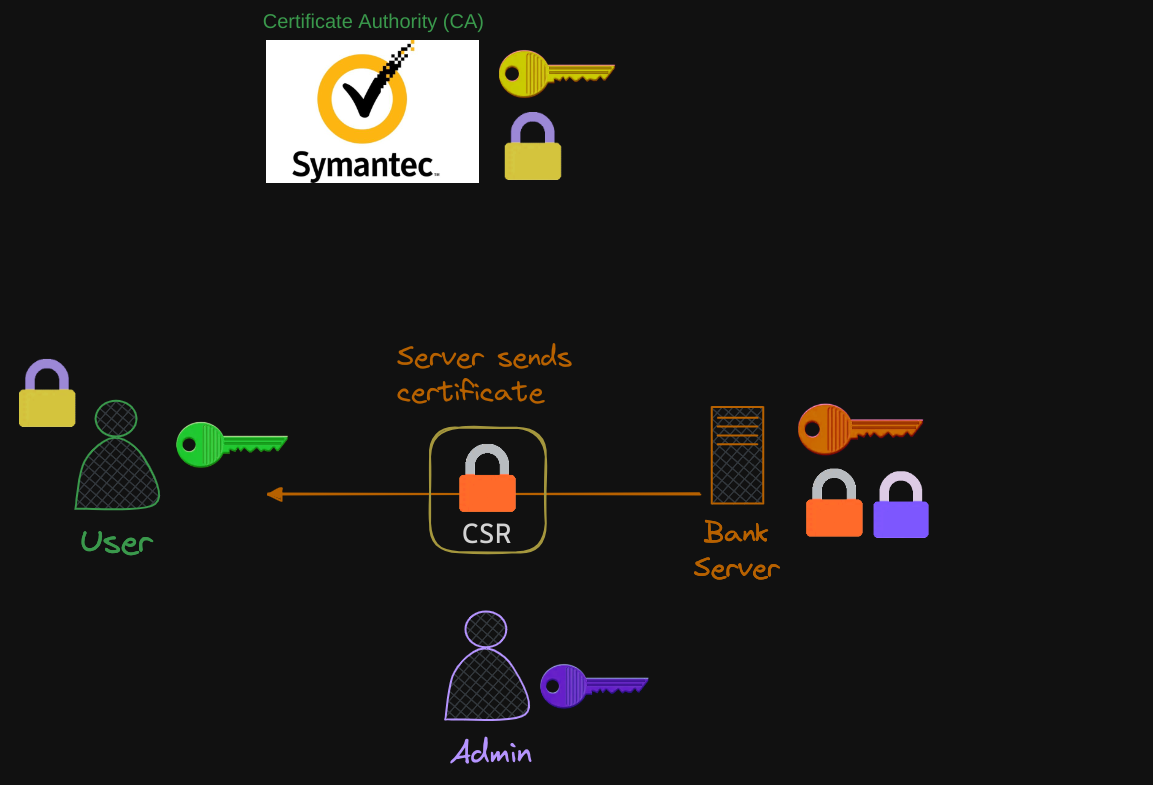
The user’s browser reads the certificate and uses the CAs public key to validate and retrieve the server’s public key.
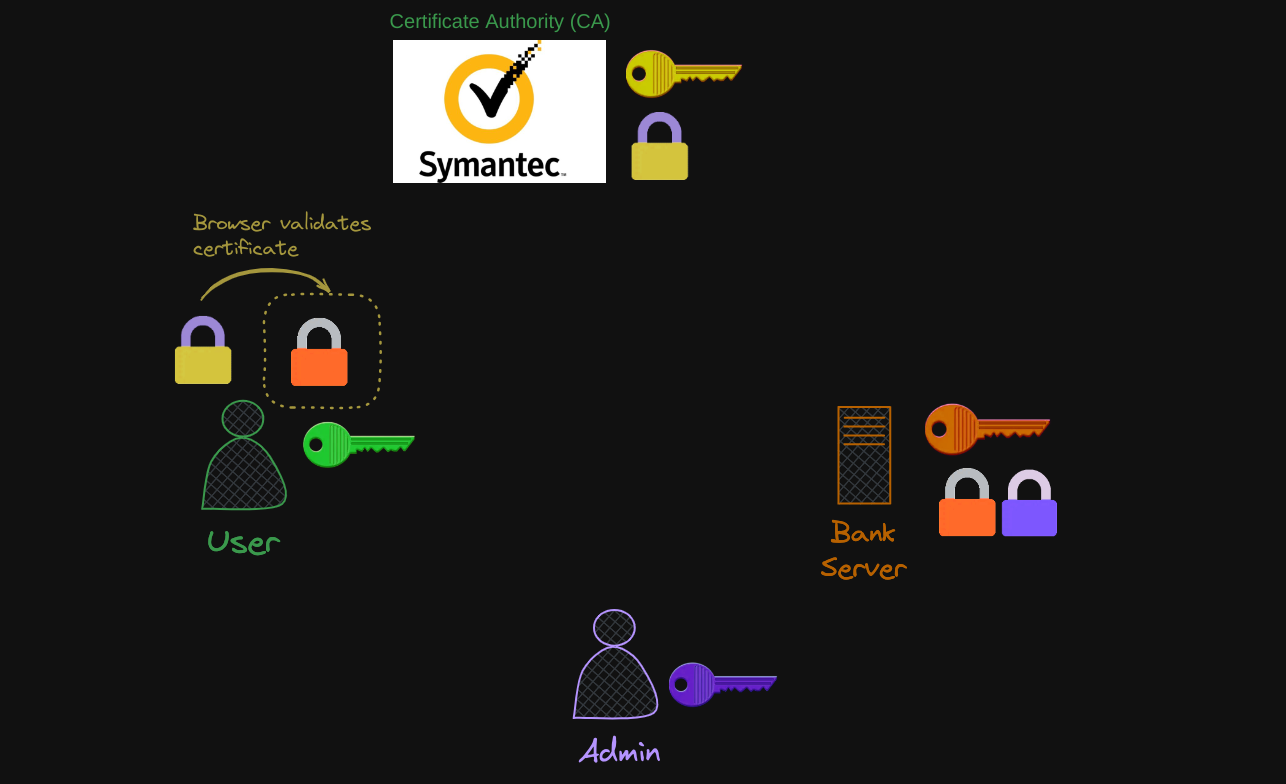
It then generates a symmetric key that it wishes to use going forward for all communication. The symmetric key is encrypted using the server’s public key and sent back to the server.
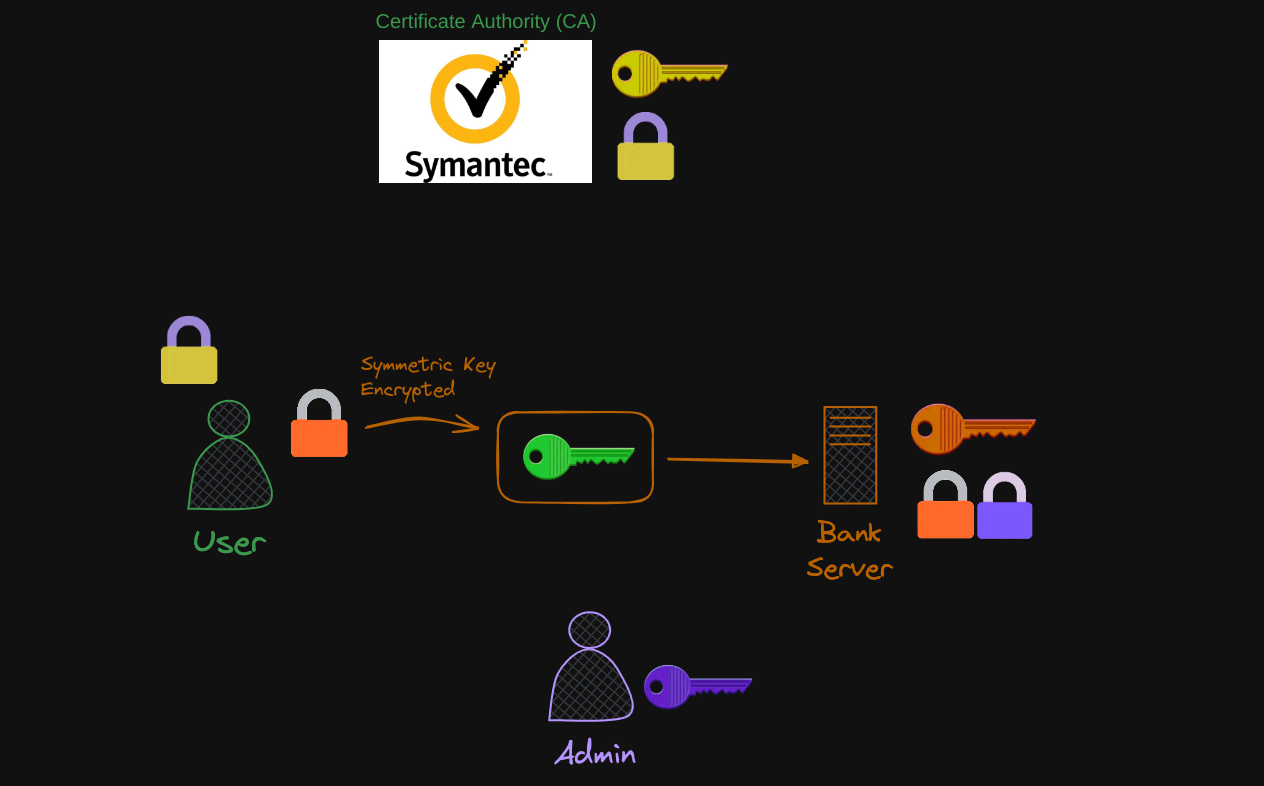
The server uses its private key to decrypt the message and retrieve the symmetric key. The symmetric key is used for communication going forward.
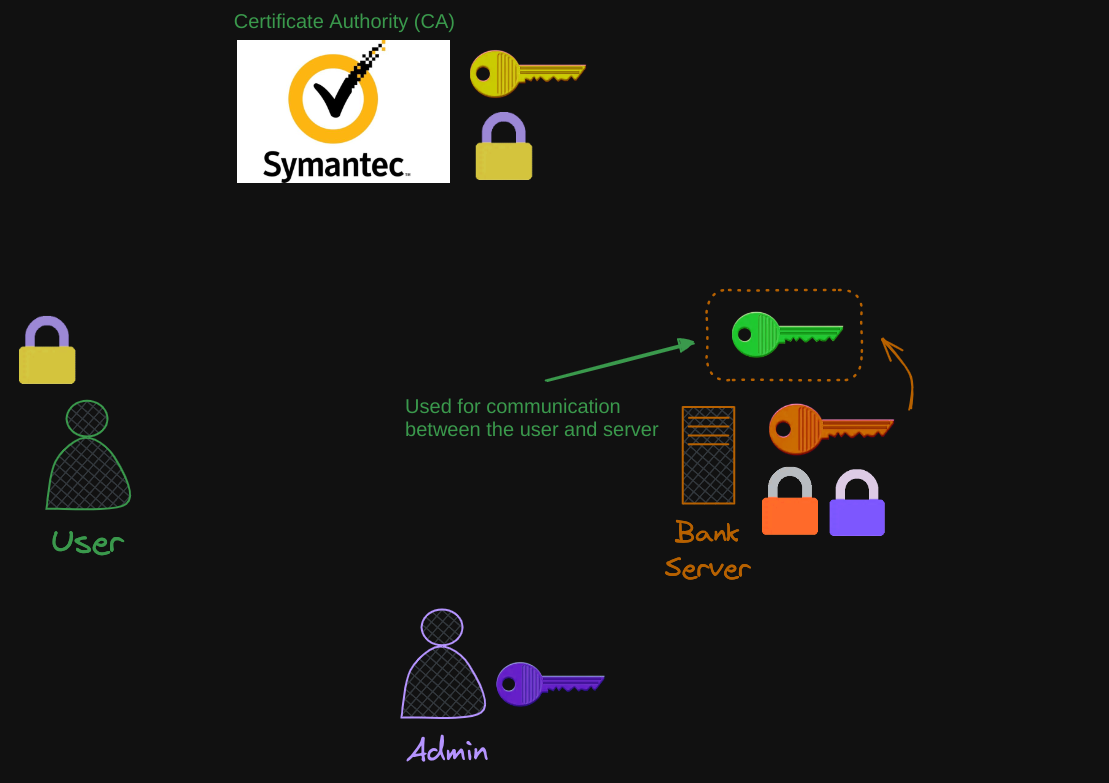
Another recap:
- The server admin generates a key pair for securing SSH.
- The bank server generates a key pair for securing the website with HTTPS.
- The certificate authority generates its own set of keeper to sign certificates.
- The end user only generates a single symmetric key.
Once this process is finished and trust has been established with the server, the user can be sure that the bank server is who it says it is, thus solving the problem mentioned before.
- However, the server does not for sure know if the client is who they say they are.
- It could be a hacker impersonating a user by somehow gaining access to his credentials, not over the network for sure, as we have secured it already with TLS, maybe by some other means such as credential compromise or some other form of impersonation.
In this scenario, we can imagine that the hacker has completed the whole trust certificate process by impersonating the user.
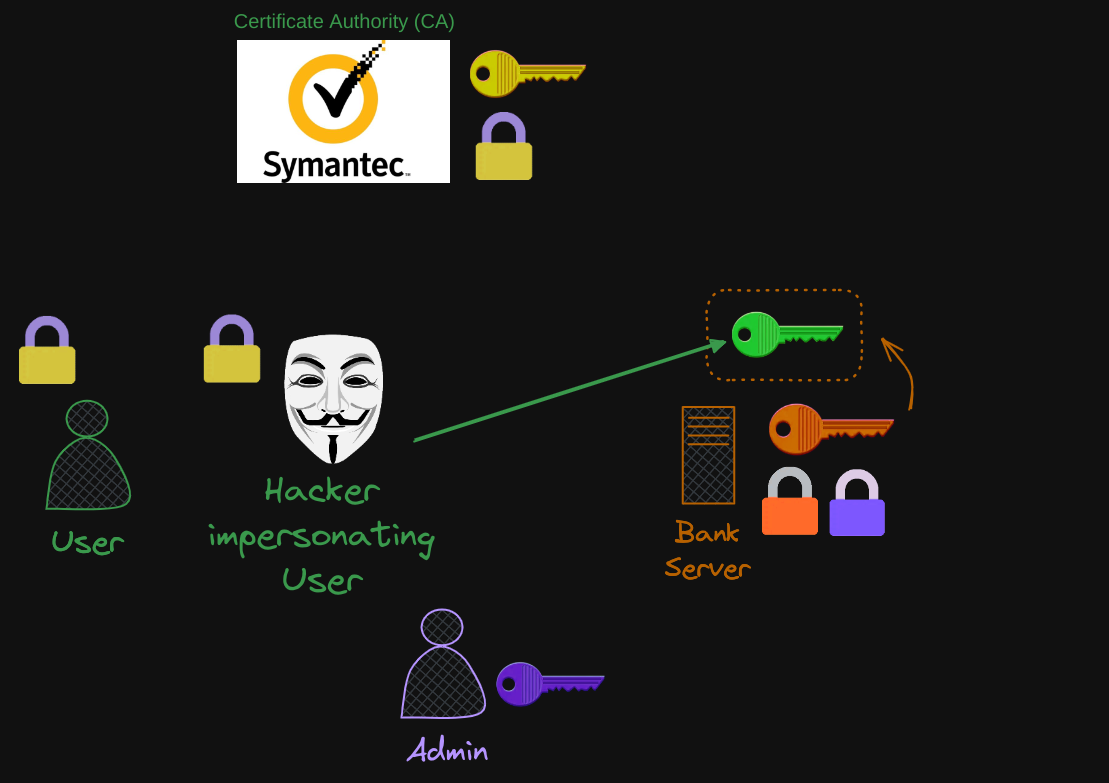
What can the server do to validate that the client is who they say they are?
- For this, the server can request a certificate from the client.
- So the client must generate a pair of keys and obtain a signed certificate from a valid CA.
- The client then sends the certificate to the server for it to verify that the client is who they say they are.
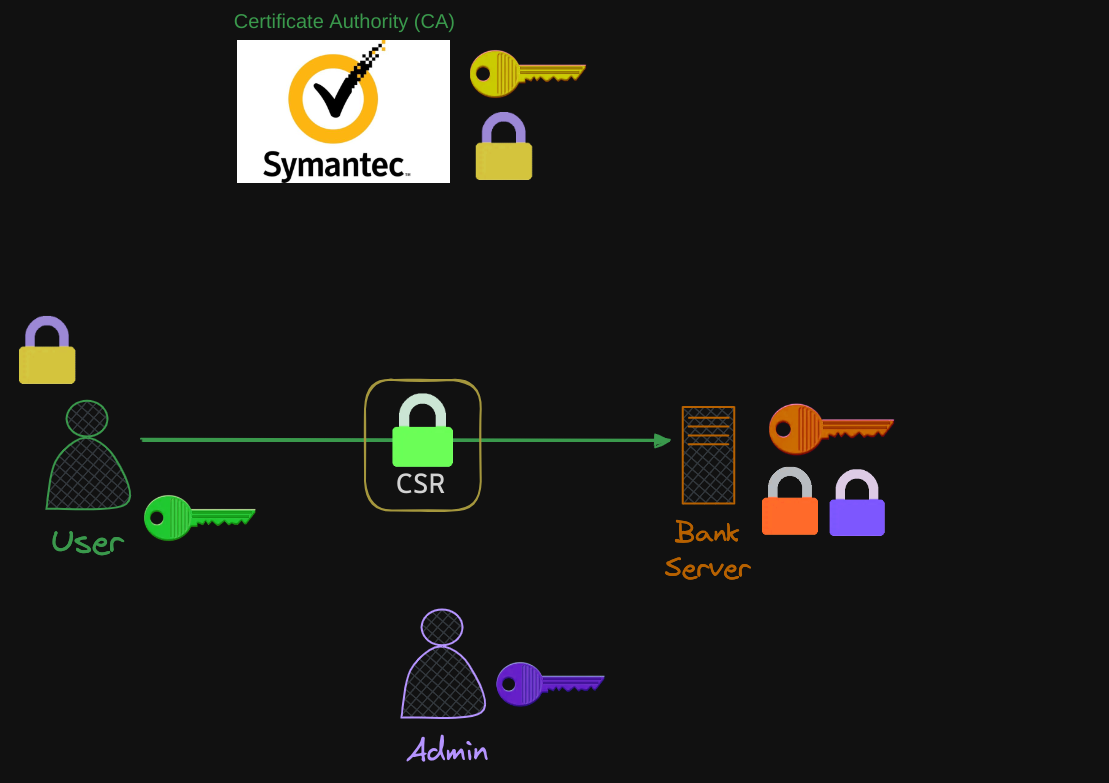
You might be thinking, “I’ve never generated a client certificate to access a website.” Well, that’s because TLS client certificates are not generally implemented on web servers. Even if they are, it’s all implemented under the hosts, i.e. the user’s web browser, application, etc. So a normal user don’t have to generate and manage certificates manually.
This whole infrastructure, including the CA, the servers, the people, and the process of generating, distributing and maintaining digital certificates is known as public key infrastructure or PKI.
One last thing to note, usually certificates with public key are named *.crt or *.pem extension. For example:
- server.crt, server.pem for server certificates
- client.crt, or client.pem for client certificates
- Private keys are usually with extension .key or -key.pem.
Just remember private keys have the word key in them usually, either as an extension or in the name of the certificate. And one that doesn’t have the word key in them is usually a public key or certificate.