Let’s think of a hypothetical scenario where you join a new team to help them manage their Kubernetes environment. You’re a new administrator to this team, and you’ve been told that there are multiple issues related to certificates in the environment. So you’re asked to perform a health check of all the certificates in the entire cluster. What do you do?
First of all, it’s important to know how the cluster was set up. There are different solutions available for deploying a Kubernetes cluster, and they use different methods to generate and manage certificates.
- If you were to deploy a Kubernetes cluster from scratch you generate all the certificates by yourself, as we did in the previous posts.
- Otherwise you may rely on an automated provisioning tool like kubeadm, which takes care of automatically generating and configuring the cluster for you.
- While you deploy all the components as native services on the nodes in the hard way, the kubeadm tool deploys these as pods.
- In this post, we’re going to look at a cluster provision by kubeadm as an example.
The idea is to create a list of certificate files used, their paths, the names configured on them, the alternate names configured (if any), the organization the certificate account belongs to, the issue of the certificate and the expiration date on the certificate.
Here’s an example table with some information about these Cert files. We will take a closer look into how these fields were filled for the health check next.
| Component | Type | Cert Path | CN Name | ALT Names | Org | Issuer | Purpose |
|---|---|---|---|---|---|---|---|
| kube-apiserver | Server | /etc/kubernetes/pki/apiserver.crt | kube-apiserver | DNS:master DNS:kubernetes DNS:kubernetes.default DNS:kubernetes.default.svc DNS:kubernetes.default.svc.cluster.local IP Address:10.96.0.1 IP Address:172.17.0.27 |
kubernetes | Server Certificate | |
| Server | /etc/kubernetes/pki/apiserver.key | kube-apiserver | Server Key | ||||
| Server | /etc/kubernetes/pki/ca.crt | kubernetes | Server CA certificate | ||||
| Client (kubelet) | /etc/kubernetes/pki/apiserver-kubelet-client.crt | kube-apiserver-kubelet-client | system:masters | kubernetes | Client Cert: Kube API Server -> Kubelet | ||
| Client (kubelet) | /etc/kubernetes/pki/apiserver-kubelet-client.key | Client Key: Kube API Server -> Kubelet | |||||
| Client (ETCD) | /etc/kubernetes/pki/apiserver-etcd-client.crt | kube-apiserver-etcd-client | system:masters | kubernetes | Client Cert: Kube API Server -> ETCD | ||
| Client (ETCD) | /etc/kubernetes/pki/apiserver-etcd-client.key | Client Key: Kube API Server -> ETCD | |||||
| Client (ETCD) | /etc/kubernetes/pki/etcd/ca.crt | kubernetes | kubernetes | Client CA File: Kube API Server to ETCD |
In order to perform a health check, start by identifying all the certificates used in the system. You get this information by checking the manifest files.
- For example, if we want to get the Kube API server’s certificate information, you can check the manifest YAML file:
$ cat /etc/kubernetes/manifests/kube-apiserver.yaml
From there, you will see the Kube API server’s command and various flags. The command used to start the API server has information about all the certificates it uses. Identify the certificate file used for each purpose and note it down.
For example, we can gather the certificate information about authenticating clients, such as kubectl, service accounts, other Kubernetes components, and external services or users, from these flags:
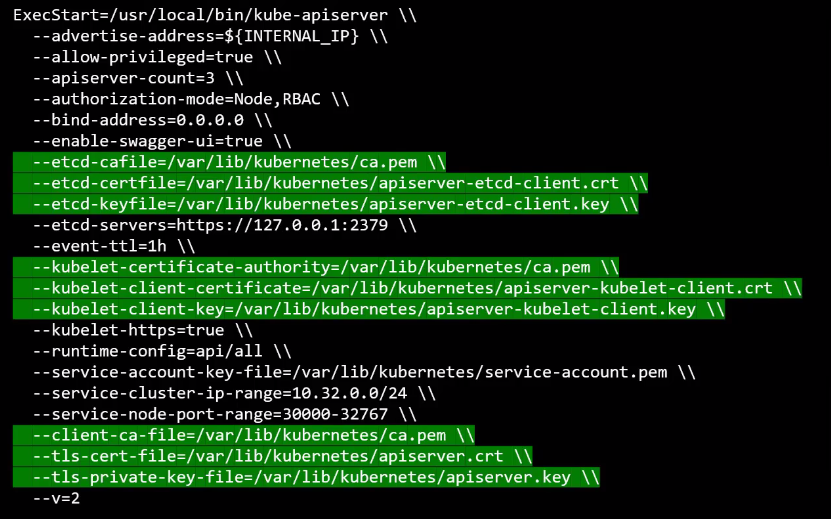
What exactly do we do with this information? Let’s take the –tls-cert-file field for example.
- Run
$ openssl x509 -in /etc/kubernetes/pki/apiserver.crt -text -noout - We provide this command and provide the certificate file as input to decode the certificate and view its details, which will look something like this:
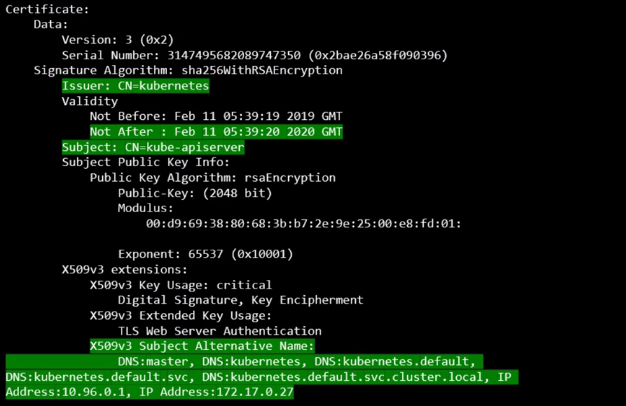
From here, we can get:
- Subject: CN (Common Name) of the certificate itself.
- Issuer: CN of the issuer of the certificate, should be the Certificate Authority (CA) who issues the certificate.
- Kubeadm names the Kubernetes CA as kubernetes itself
- Not After: Expiration Date
- X509v3 Subject Alternative Name: ALT Names
Checks to perform:
- Make sure the correct CN and ALT names, Organization are present. Specifically for the kube-api server and the nodes(kubelets).
- Ensure the certificates are not expired! (Important)
- Ensure the certificates are issued by the right CA! (Important)
- Ensure the correct certificate path is provided in the options on the service configuration files
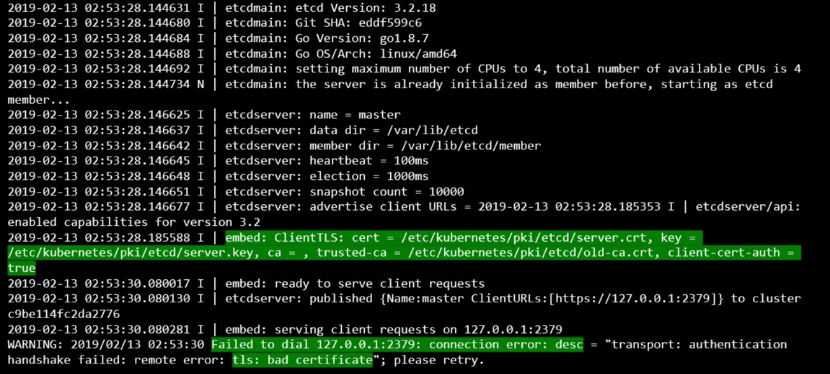
When encountering issues, it’s crucial to examine logs for insights. If you’ve manually set up the cluster and configured services as “native services” within the operating system, you should access service logs using the OS’s logging functionality, such as journalctl on Linux systems.
$ journalctl -u etcd.service -l
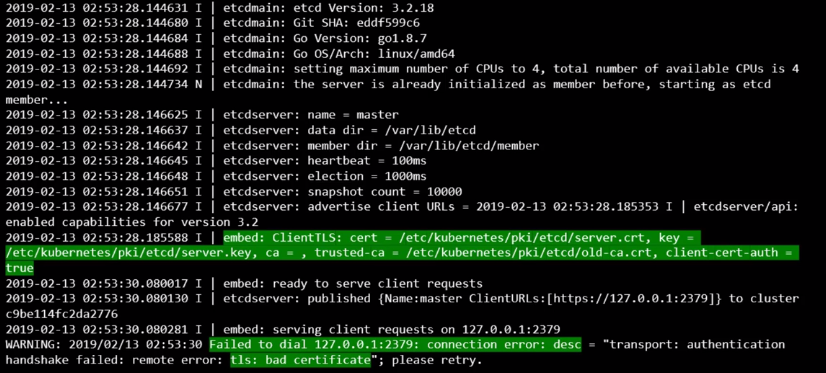
However, if you’ve deployed the cluster with kubeadm, the components operate as pods. To access logs, utilize the $ kubectl logs command followed by the pod’s name.
e.g. $ kubectl logs etcd-master
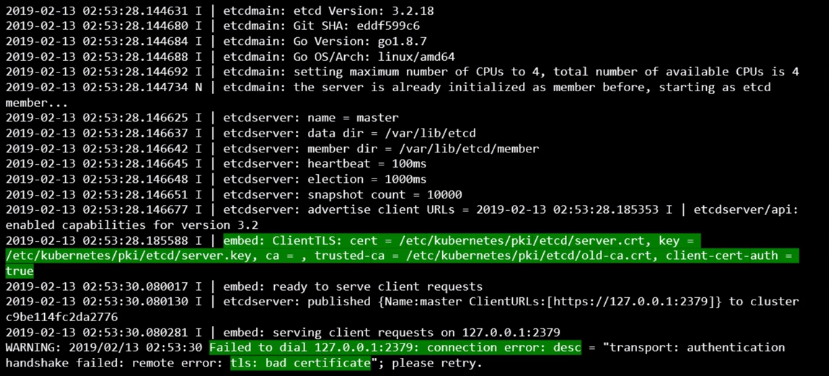
Sometimes if the core components such as the Kubernetes API server or the ETCD server are down, the kubectl commands won’t function. In that case, you have to go one level down to Docker to fetch the logs.
First list all containers using $ docker ps -a

Then retrieve logs with $ docker logs <container id>
e.g. $ docker logs 87fc69913973
