In this post, we are going to talk about Docker storage drivers and file systems. We’re going to see where and how Docker stores data and how it manages file systems of the containers.
Let’s start with how Docker stores data on the local file system. When you install Docker on a system, it creates a folder structure at /var/lib/docker/.
/var/lib/docker/
├── aufs/
├── containers/
├── image/
├── volumes/
└── <other folders>
It has multiple folders under it called AUFS, containers, image, volumes, et cetera. This is where Docker stores all of its data by default, which is anything related to images and containers running on the Docker host.
For example…
- All files related to containers are stored under the containers folder
- Files related to images are stored under the image folder
- Any volumes created by the Docker containers are created under the volumes folder
Docker’s Layered Architecture
To understand how Docker stores the files of an image and a container, we need to explore Docker’s layered architecture. When Docker builds images, it constructs them in layers. Each line of instruction in the Dockerfile creates a new layer in the Docker image, capturing just the changes from the previous layer.
Consider the following Dockerfile:
FROM ubuntu

RUN apt-get update && apt-get -y install python

RUN pip install flask flask-mysql

COPY . /opt/source-code

ENTRYPOINT FLASK_APP=/opt/source-code/app.py flask run
Here’s what each instruction does:
- First Layer: The
FROM ubuntuinstruction creates a base layer with the Ubuntu operating system. - Second Layer: The
RUN apt-get update && apt-get -y install pythoninstruction creates a second layer that installs all the apt packages. - Third Layer: The
RUN pip install flask flask-mysqlinstruction creates a third layer that installs the Python packages. - Fourth Layer: The
COPY . /opt/source-codeinstruction creates a fourth layer that copies the source code into the image.- This command copies all the files from the current directory on the host machine into the
/opt/source-codedirectory inside the Docker image, which ensures that all your application’s source code and any other necessary files are included in the Docker image.
- This command copies all the files from the current directory on the host machine into the
- Fifth Layer: The
ENTRYPOINT FLASK_APP=/opt/source-code/app.py flask runinstruction creates a fifth layer that sets the entry point for the image.- In this case, it sets the
FLASK_APPenvironment variable to point to your application’s entry point and runs the Flask application.
- In this case, it sets the
Since each layer only stores the changes from the previous layer, the image size reflects these incremental changes. For instance, the base Ubuntu image is around 120 megabytes, the apt packages add approximately 300 MB, and the subsequent layers add their respective sizes.
You can then build this Dockerfile using:
$ docker build Dockerfile -t user/custom-docker-app
Advantages of Layered Architecture
To understand the advantages of this layered architecture, let’s consider a second application. This application has a different Dockerfile but is very similar to our first application, using the same base image as Ubuntu, the same Python and Flask dependencies, but different source code to create a different application and a different entry point as well.
FROM ubuntu

RUN apt-get update && apt-get -y install python

RUN pip install flask flask-mysql

COPY . /opt/another-source-code

ENTRYPOINT FLASK_APP=/opt/another-source-code/app.py flask run
Reusing Layers
When building this new image, Docker reuses the first three layers (Ubuntu base, APT packages, Python packages) from the cache, as they are identical to the first application. It only builds the last two layers (new source code and entry point) which provides a few benefits:
- Speed: Faster builds by reusing existing layers.
- Storage: Saves disk space by not duplicating layers.
- Flexibility: Efficiently handles updates by rebuilding only the changed layers.
This layered approach allows Docker to build images quickly and efficiently, conserving both time and storage.
This is also applicable if you were to update your application code. Whenever you update your application code, such as the app.py in this case, Docker simply reuses all the previous layers from the cache and quickly rebuilds the application image by updating the latest source code, thus saving us a lot of time during rebuilds and updates.
Image and Container Layers
Let’s rearrange the layers bottom-up so we can understand it better.
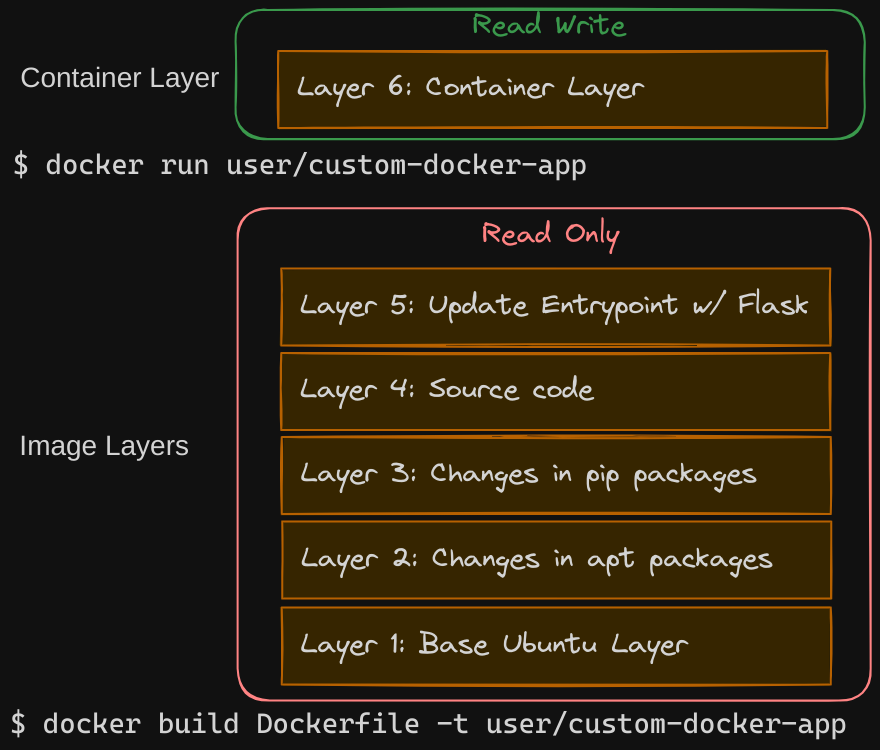
Image Layers
At the bottom, we have the base Ubuntu layer, then the packages, then the dependencies, then the source code of the application, and then the entry point. All of these layers are created when we run the docker build command to form the final Docker image. These are the Docker image layers.
- Once the build is complete, you cannot modify the contents of these layers, and so they are read-only. You can only modify them by initiating a new build.
- It’s important to note that the same image layers are shared by all containers created using this image.
Container Layer
When you run a container based off of this image using the docker run command, Docker creates a container based off of these layers and creates a new writable layer on top of the image layer.
- The writable layer is used to store data created by the container, such as log files written by the applications, any temporary files generated by the container, or just any file modified by the user on that container.
- The life of this layer is only as long as the container is alive. When the container is destroyed, this layer and all of the changes stored in it are also destroyed.
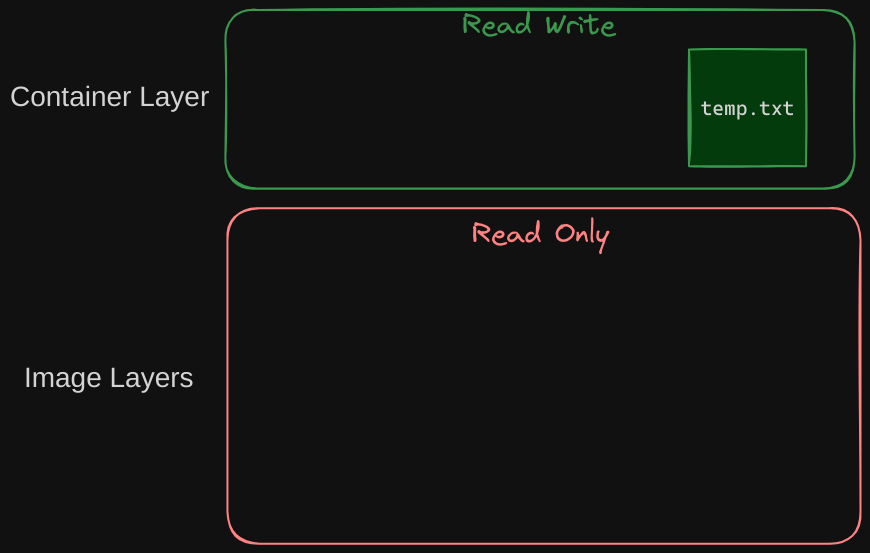
For example, if you logged into the newly created container and create a new file called temp.txt, it will be created in the writable container layer. The files in the image layers are read-only, meaning you cannot edit anything in those layers.
Copy on Write Mechanism
Let’s take an example of our application code. Since we bake our code into the image, the code is part of the image layer and as such is read-only after running a container.
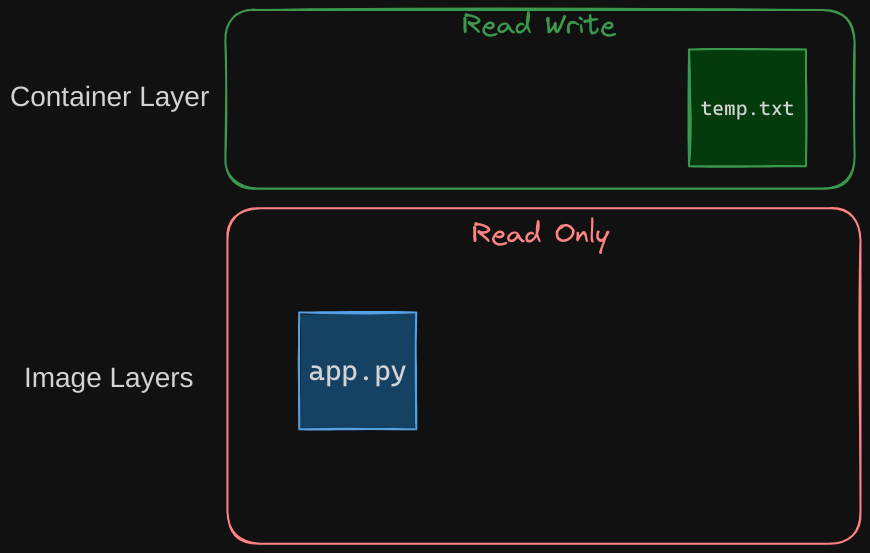
What if I wish to modify the source code to test a change? Remember, the same image layer may be shared between multiple containers created from this image. So does it mean that I cannot modify this file inside the container? No, I can still modify this file, but before I save the modified file, Docker automatically creates a copy of the file in the read-write layer, and I will then be modifying a different version of the file in the read-write layer.
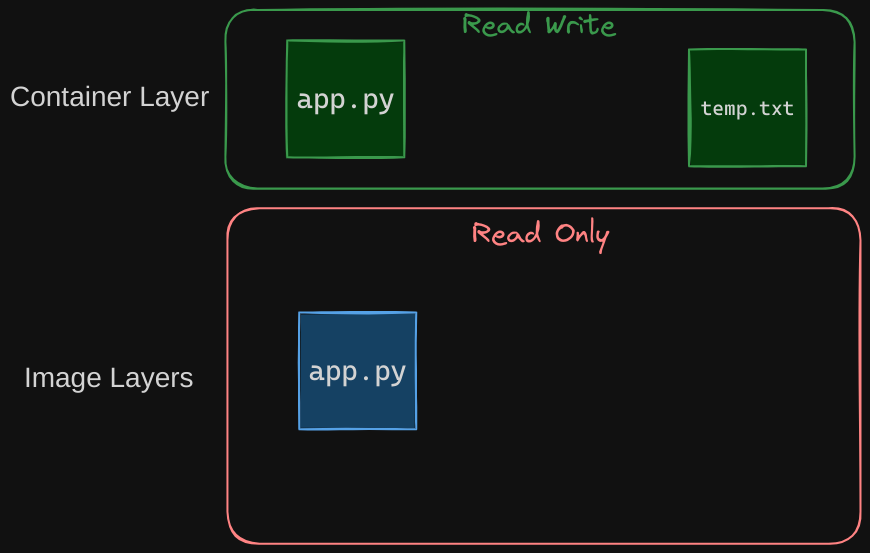
All future modifications will be done on this copy of the file in the read-write layer. This is called the copy-on-write mechanism.
The image layer being read-only just means that the files in these layers will not be modified in the image itself. So the image will remain the same all the time until you rebuild the image using the docker build command. What happens when we get rid of the container? All of the data that was stored in the container layer also gets deleted. The change we made to the app.py and the new temp file we created will also get removed.
Persisting Data
What if we wish to persist this data? For example, if we were working with a database and we would like to preserve the data created by the container, we could add a persistent volume to the container. To do this, first create a volume using the $ docker volume create command.
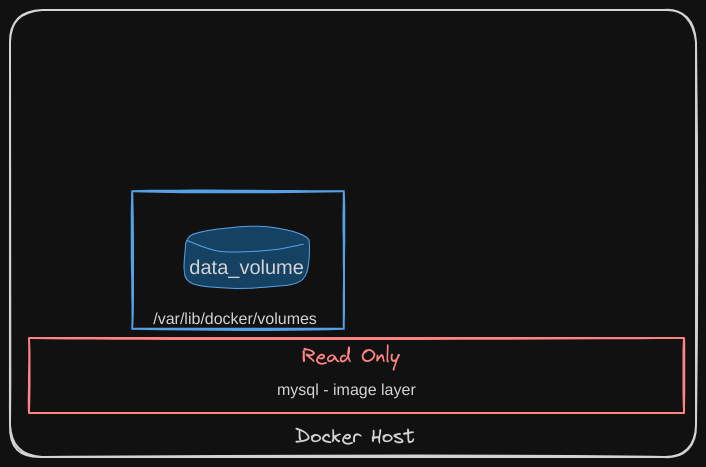
When you run this command, it creates a folder called data_volume under the /var/lib/docker/volumes directory.
/var/lib/docker
└── volumes
	└── data_volume
Then, when you run the Docker container using the docker run command, you can mount this volume inside the Docker container’s read-write layer using the -v option:
docker run -v data_volume:/var/lib/mysql mysql
This will create a new container and mount the data volume we created into the /var/lib/mysql folder inside the container.
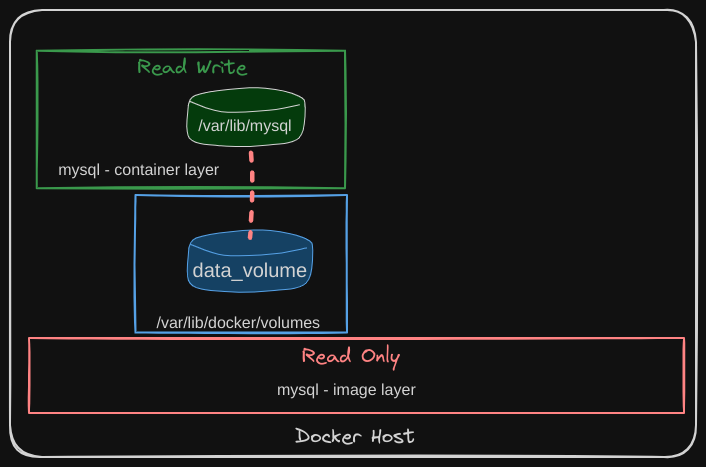
Now all data written by the database is stored on the data_volume created on the Docker host. Even if the container is destroyed, the data is still preserved.
Volume Mounting
If you run the docker run command to create a new instance of the MySQL container with a volume named data_volume2, which has not been created yet, Docker will automatically create the volume for you.
$ docker run -v data_volume2:/var/lib/mysql mysql
By executing this command, Docker will automatically create a volume named data_volume2 and mount it to the /var/lib/mysql directory inside the container. You can verify the creation of this volume by listing the contents of the /var/lib/docker/volumes folder on the Docker host.
$ ls /var/lib/docker/volumes
This automatic creation and mounting of volumes are referred to as volume mounting, where Docker handles the creation and management of volumes within the /var/lib/docker/volumes directory.
Bind Mounting
But what if you already have your data located at a different path on the Docker host? For example, let’s say you have some external storage on the Docker host at /data, and you would like to store the database data on this existing volume instead of the default /var/lib/docker/volumes folder. In that case, you can run a container using the following command:
docker run -v /data/mysql:/var/lib/mysql mysql
This will create a container and mount the folder to the container, and this is called bind mounting.
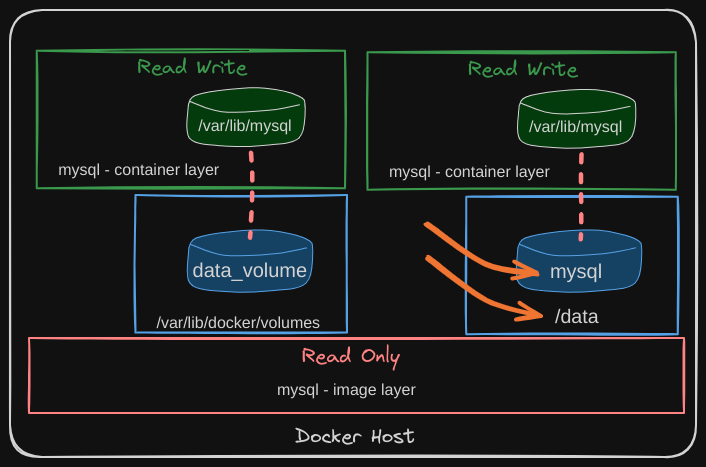
So there are two types of mounts: volume mounting and bind mounting.
- Volume mount mounts a volume from the volumes directory
- Bind mount mounts a directory from any location on the Docker host
New Mount Syntax
Using the -v option is considered the older method for mounting volumes. The modern and preferred approach is to use the --mount option. The --mount option is more explicit and requires you to specify each parameter in a key=value format, making it clearer and more readable.
For example, the previous command can be rewritten using the --mount option as follows:
docker run --mount type=bind,source=/data/mysql,target=/var/lib/mysql mysql`
In this command:
type=bindspecifies that a bind mount is being used.source=/data/mysqlindicates the directory on the host that you want to mount.target=/var/lib/mysqlspecifies the directory inside the container where the source directory will be mounted.
Storage Drivers
Storage drivers manage Docker’s operations, including maintaining the layered architecture, creating writable layers, and enabling the copy-on-write mechanism. Docker relies on storage drivers to implement its layered architecture.
Some common storage drivers:
- AUFS: Allows multiple layers to be mounted, creating a unified file system. Historically used on Ubuntu.
- Btrfs: Offers high performance and advanced features like snapshotting and self-healing. Efficient for large data sets.
- ZFS: Known for robustness and scalability, providing data compression, deduplication, and protection against corruption.
- Device Mapper: Creates virtual layers on block devices, commonly used on Red Hat-based systems.
- Overlay: Provides a lightweight layer over existing file systems, efficient and commonly used.
- Overlay2: An improved version of Overlay with better performance and stability, suitable for large-scale deployments.
The choice of storage driver depends on factors such as the underlying operating system, performance requirements, and feature set. For example, Docker might use AUFS or Overlay2 on Ubuntu, and Device Mapper or Overlay2 on Fedora or CentOS. High-performance applications might require optimized drivers, while others may need advanced features like snapshotting. Evaluating these factors will help you select the best storage driver for your needs.