Networking Basics
Let’s now explore basic networking elements like switching, routing, gateways, and DNS, and get a brief introduction to CoreDNS. We’ll also look at configuring DNS settings on a Linux system and understanding network namespaces in Linux.
Instead of diving into theoretical concepts like the OSI model, we’ll focus on practical configurations and commands from a Linux perspective. This approach is geared toward system administrators and application developers rather than network engineers. If you’re already comfortable with Linux networking, feel free to skip to the Kubernetes-specific posts.
Understanding Networks
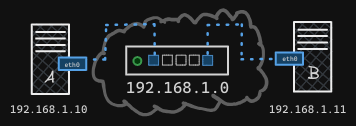
A network connects multiple computers, allowing them to communicate. For example, connecting two computers, A and B, to a switch creates a network. Each computer needs a network interface, either physical or virtual, to connect to the switch. In this example, the network interface is eth0, which you can view using the $ ip link command.

Assume a network with the address 192.168.1.0. Assign IP addresses to the systems using the ip addr command. For example, you can assign the IP address 192.168.1.10 to the interface eth0 on a host with the following command for computer A:
$ ip addr add 192.168.1.10/24 dev eth0
Similarly, you can assign the IP address 192.168.1.11 to the interface eth0 on computer B with the following command:
$ ip addr add 192.168.1.11/24 dev eth0
The /24 in the IP address assignment specifies the subnet mask, meaning that the first 24 bits of the IP address are used to identify the network portion. This leaves the remaining 8 bits for identifying individual devices (hosts) on that network.
In binary, the subnet mask for /24 looks like this:
11111111.11111111.11111111.00000000
Converted to decimal, this is 255.255.255.0. This mask tells the network that the first three octets (192.168.1) are the network part, and the last octet is used for host addresses within that network.
Therefore, with a /24 subnet mask, the network address is 192.168.1.0, and it allows for 256 possible addresses in this range (from 192.168.1.0 to 192.168.1.255), where 192.168.1.0 is the network address and 192.168.1.255 is the broadcast address.
For more information on IP addresses and subnets, visit cidr.xyz for an interactive visualizer.
Once the interfaces are up and IP addresses are assigned, the computers can communicate through the switch, which only enables communication within the same network.

Adding a Router
Let’s say that we have another similar network with computers C and D and a switch at address 192.168.2.0. To connect different networks, such as 192.168.1.0 and 192.168.2.0, you need a router. A router has interfaces on each network, enabling it to route traffic between them.
- For example, the router might have IP
192.168.1.1on the first network and192.168.2.1on the second.

Systems on each network need to know where the router is to send traffic to the other network. This is configured using a gateway. The gateway acts like a door to other networks.
- You can view existing routes with the
$ routecommand, which displays the kernel’s routing table.
For this example, let’s assume that there are no routes configured yet, and therefore no gateway. To configure a gateway, use the $ ip route add command to specify that traffic to the 192.168.2.0 network should go through the router at 192.168.1.1.
$ ip route add 192.168.2.0/24 via 192.168.1.1
Now that this route has been added, computers A and B can communicate with computers C and D using the router as a gateway.
Configuring Internet Access
Now, suppose these systems need access to the internet. For example, they need to access Google’s network at 172.217.194.0. To enable this, you could connect the router to the internet and add a new route in your routing table to route all traffic to the 172.217.194.0 network through your router.
![Switching and Routing 4]
However, there are countless different sites on different networks on the internet. Instead of adding a routing table entry for each network, you can configure a default route. This way, you can specify that any traffic to a network for which there is no specific route should use this router as the default gateway.
This is done by adding a default route in the routing table:
$ ip route add default via 192.168.1.1
Or equivalently:
$ ip route add 0.0.0.0/0 via 192.168.1.1
This tells the system that any request to any network outside of your existing network should go through the router at 192.168.1.1. This way, all traffic destined for unknown networks is directed to this particular router, which then forwards it to the internet.
Multiple Routers and Routing Entries
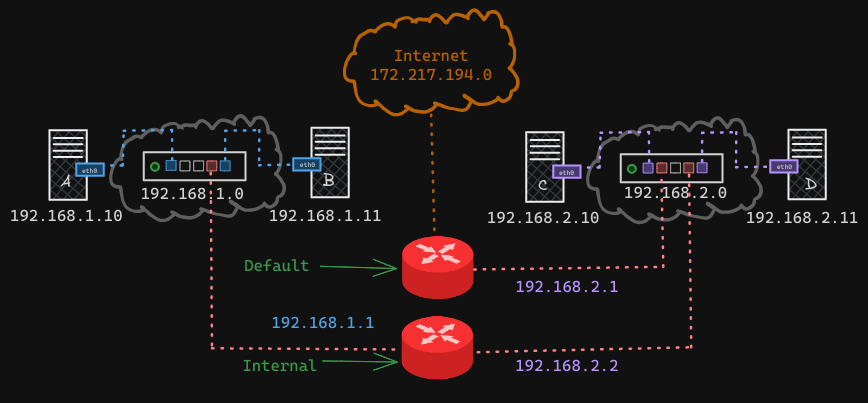
If you have multiple routers in your network, such as one for the internet and another for the internal private network, you will need to configure separate entries for each network.
- Specifically, you’ll need one entry for the internal private network and another entry for the default gateway to handle all other networks, including public networks.
Internal:
$ ip route add 192.168.1.0/24 via 192.168.2.2
Default GW:
$ ip route add default via 192.168.1.1
# or...
$ ip route add 0.0.0.0/0 via 192.168.1.1
All together, the network now looks like this:

If you’re experiencing issues reaching the internet from your systems, checking the routing table and default gateway configuration is a good place to start.
Setting Up a Linux Host as a Router
It’s also possible to set up a Linux host as a router, meaning you can configure a Linux machine to route traffic between networks. Let’s look at a simple setup with three hosts: A, B, and C.

- Hosts A and B are connected to the
192.168.1.0network, and hosts B and C are connected to the192.168.2.0network. - Host B is connected to both networks using two interfaces:
eth0andeth1. - Host A has the IP
192.168.1.5, host C has the IP192.168.2.5, and host B has IPs192.168.1.6and192.168.2.6.
How would you enable communication between hosts A and C?
- Ping Attempt 1: If you try to ping
192.168.2.5(machine C) from host A, you will get a “network is unreachable” error because host A doesn’t know how to reach the192.168.2.0network. - Add Route on Host A: Add a routing table entry on host A to tell it that the gateway to the
192.168.2.0network is through host B at192.168.1.6:
$ ip route add 192.168.2.0/24 via 192.168.1.6
- Return Path on Host C: Host C also needs to know how to reach host A. Add a routing table entry on host C to tell it that the gateway to the
192.168.1.0network is through host B at192.168.2.6:
$ ip route add 192.168.1.0/24 via 192.168.2.6
- Ping Attempt 2: Now when you attempt to ping
192.168.2.5(machine C) from host A, you will no longer get the “Network is unreachable” message. This means that the routes are set up correctly.- However at this point, we still will not get a response back. This is because by default, packets are not forwarded from one interface to the next for security reasons, i.e., Packets recieved on host B at eth1 from machine C will not automatically be forwarded elsewhere through eth0.
- Since we know that both A and C are private networks, we can enable communication between them.
- However at this point, we still will not get a response back. This is because by default, packets are not forwarded from one interface to the next for security reasons, i.e., Packets recieved on host B at eth1 from machine C will not automatically be forwarded elsewhere through eth0.
- Enable Packet Forwarding on Host B: Whether or not a host can forward packets between interfaces is governed by a setting on the
/proc/sys/net/ipv4/ip_forwardfile, which by default is0. To enable packet forwarding on host B, set theip_forwardvalue to1:
$ echo 1 > /proc/sys/net/ipv4/ip_forward
- Now when you run a ping, you will get replies.
To make this change permanent across reboots, modify the /etc/sysctl.conf file:
net.ipv4.ip_forward = 1
Now, host A should be able to communicate with host C.