In this post, we will discuss service networking. In previous posts, we covered pod networking, including how bridge networks are created within each node, how pods get namespaces created for them, and how interfaces are attached to those namespaces. We also explored how pods are assigned IP addresses within the subnet assigned to each node and how they can communicate across nodes, forming a large virtual network.
Service Networking Overview
In Kubernetes, you would rarely configure pods to communicate directly with each other. Instead, if you want a pod to access services hosted on another pod, you would typically use a service. Let’s quickly recap the different types of services.
Types of Services
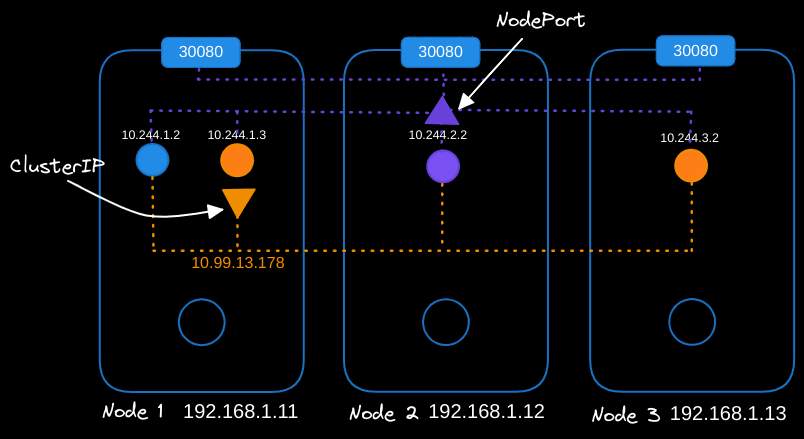
To make the orange pod accessible to the blue pod, we create an orange service. The orange service gets an IP address and a name assigned to it. The blue pod can now access the orange pod through the orange service’s IP or its name.
ClusterIP Service
The blue and orange pods might be on the same node, but what about access from other pods on other nodes? When a service is created, it is accessible from all pods in the cluster, regardless of which nodes the pods are on. A service is not bound to a specific node; it exists across the cluster. However, it is only accessible from within the cluster. This type of service is known as ClusterIP.

For instance, if the orange pod hosts a database application that should only be accessed from within the cluster, a ClusterIP service works well.
NodePort Service
If the purple pod hosts a web application that needs to be accessible outside the cluster, we create a service of type NodePort. This service also gets an IP address and works like ClusterIP, allowing all other pods to access it using its IP. Additionally, it exposes the application on a port on all nodes in the cluster, making it accessible to external users or applications.
How Services Get IP Addresses
Our focus now shifts to understanding how services…
- Get IP addresses
- How they are made available across all nodes in the cluster
- How they are exposed to external users through a port on each node.
Kubelet and Kube-proxy
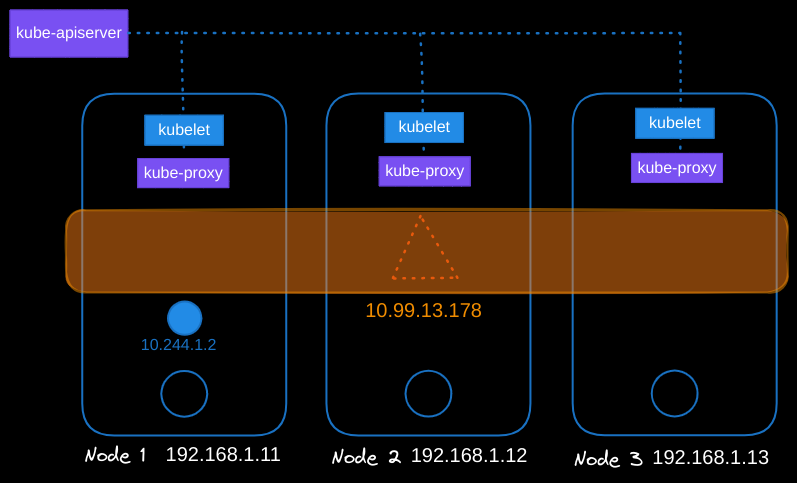
Certain components, such as kubelet and kube-proxy, play a crucial role in managing networking and routing services within Kubernetes clusters. In a typical Kubernetes cluster, each node runs a kubelet process, which is responsible for creating pods. The kubelet service on each node watches for changes in the cluster through the Kube API server and creates pods as needed, invoking the CNI plugin to configure networking.
Similarly, each node runs another component known as kube-proxy. Kube-proxy also watches for changes in the cluster through the Kube API server. When a new service is created, kube-proxy gets into action. Unlike pods, services are a cluster-wide concept and exist across all nodes in the cluster.

Virtual Nature of Services
It’s important to note that services are virtual objects in Kubernetes. There is no actual server or process listening on the service’s IP address. While pods have containers, namespaces, interfaces, and IPs assigned to those interfaces, services have none of these. Instead, when a service is created, it is assigned an IP address from a predefined range.
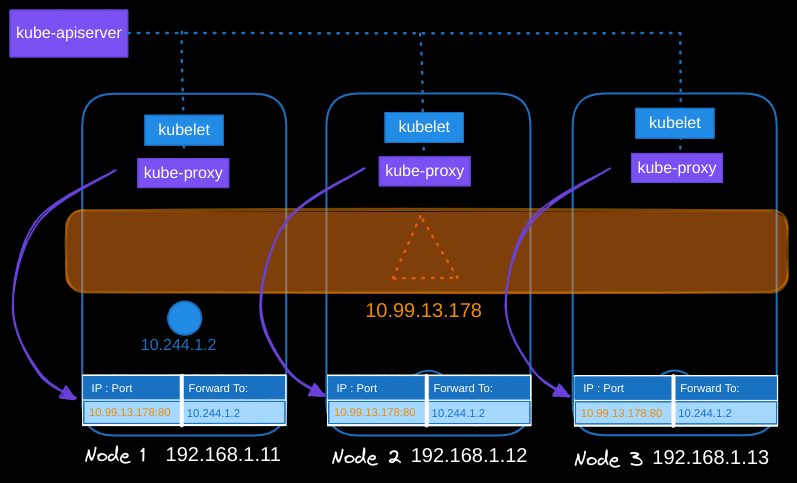
The kube-proxy components running on each node receive that IP address and create forwarding rules on each node, directing traffic intended for the service’s IP to the corresponding pod’s IP.
Service IP Address Assignment
When a service object is created in Kubernetes, it is assigned an IP address from a predefined range. The kube-proxy component, running on each node in the cluster, retrieves this IP address and sets up forwarding rules. These rules ensure that traffic directed to the service IP is forwarded to the appropriate pod’s IP.

How kube-proxy Manages Service Traffic
Service IP Assignment
Each service gets an IP from the Kubernetes API server’s --service-cluster-ip-range. For example, with --service-cluster-ip-range=10.96.0.0/12, service IPs fall within 10.96.0.0 to 10.111.255.255. Here, the service IP is 10.99.13.78.
Forwarding Rules
kube-proxy sets up forwarding rules to route traffic from the service IP and port to the correct backend pod. For instance, if the service listens on port 80 (commonly used by web servers), traffic arriving at 10.99.13.78:80 is directed to the appropriate pod’s IP, such as 10.244.1.2.
- kube-proxy also automatically updates these rules when services are added or removed.
Proxy Modes
kube-proxy supports three modes:
- iptables (default): Uses iptables rules for routing.
- Userspace: Proxies traffic through a userland process.
- IPVS: Uses IPVS for efficient kernel-level routing.
Use --proxy-mode to select a mode, defaulting to iptables if unspecified.
$ kube-proxy --proxy-mode [userspace | iptables | ipvs ]...
NodePort Services
For services of type NodePort, kube-proxy creates additional iptables rules:
- Traffic sent to a specific port on any node is routed to the appropriate backend pod.
Example: ClusterIP Redis Service
Let’s look at how iptables are configured by kube-proxy using a redis pod as an example. Suppose you have a redis pod running on Node 1 with the IP address 10.244.1.2, serving traffic on port 6379. To make this pod accessible within the cluster:
-
Create the Service:
Create aClusterIPservice to expose the pod:kubectl expose pod <pod-name> \ --port=6379 --target-port=6379 --name=redis-service --type=ClusterIP--port: The port the service makes available cluster-wide.--target-port: The port on which the pod listens (in this case, 6379 for Redis).--name: The name of the service.--type: The type of service (ClusterIP by default).
-
Verify the Service Exists:
kubectl get service redis-serviceThis outputs the ip and port of the service:
NAME           TYPE        CLUSTER-IP     EXTERNAL-IP   PORT(S)    AGE
redis-service  ClusterIP   10.103.132.104 <none>        6379/TCP   2m
The assigned service IP (
10.103.132.104in this example) allows other pods in the cluster to reach the Redis service via10.103.132.104:6379. -
kube-proxy Sets Up Rules:
- kube-proxy creates
iptablesrules to forward traffic from the service IP to the pod. - Traffic sent to
10.103.132.104:6379is redirected to the pod’s IP,10.244.1.2:6379.
- kube-proxy creates
To view the rules created by kube-proxy, run:
iptables -t nat -L -n -v
Look for the service name in the output. kube-proxy adds comments to these rules for easy identification.
Avoiding IP Overlap
When setting up Kubernetes networking, make sure the IP ranges for pods and services don’t overlap. For example:
- Pod Network CIDR (
--pod-network-cidr): A range like10.244.0.0/16allocates pod IPs from10.244.0.0to10.244.255.255. - Service IP Range (
--service-cluster-ip-range): A range like10.96.0.0/12allocates service IPs from10.96.0.0to10.111.255.255.
Using distinct ranges prevents conflicts where a service and a pod could inadvertently share the same IP.
Troubleshooting kube-proxy
- View iptables Rules: Check which rules kube-proxy has configured:
iptables -t nat -L -n -v - Check kube-proxy Logs: Inspect logs for the configured proxy mode and any rule updates:
kubectl logs -n kube-system -l k8s-app=kube-proxy
If the logs don’t show enough detail, increase verbosity to see more information about routing changes.