In this post, we’ll dive into the concept of ingress in Kubernetes. One of the most common questions is understanding the difference between services and ingress, and knowing when to use each. We’ll start with a quick review of services and gradually explore the role and functionality of ingress.
Services and Ingress: A Comparison
Scenario: Deploying an Online Store
Let’s imagine you’re deploying an application for a company with an online store at myonlinestore.com. The application is deployed as a pod within a Kubernetes deployment, and you also deploy a MySQL database pod. To make the database accessible to your application, you create a ClusterIP service called mysql-service. To expose your application to external users, you set up a NodePort service and assign it port 38080.
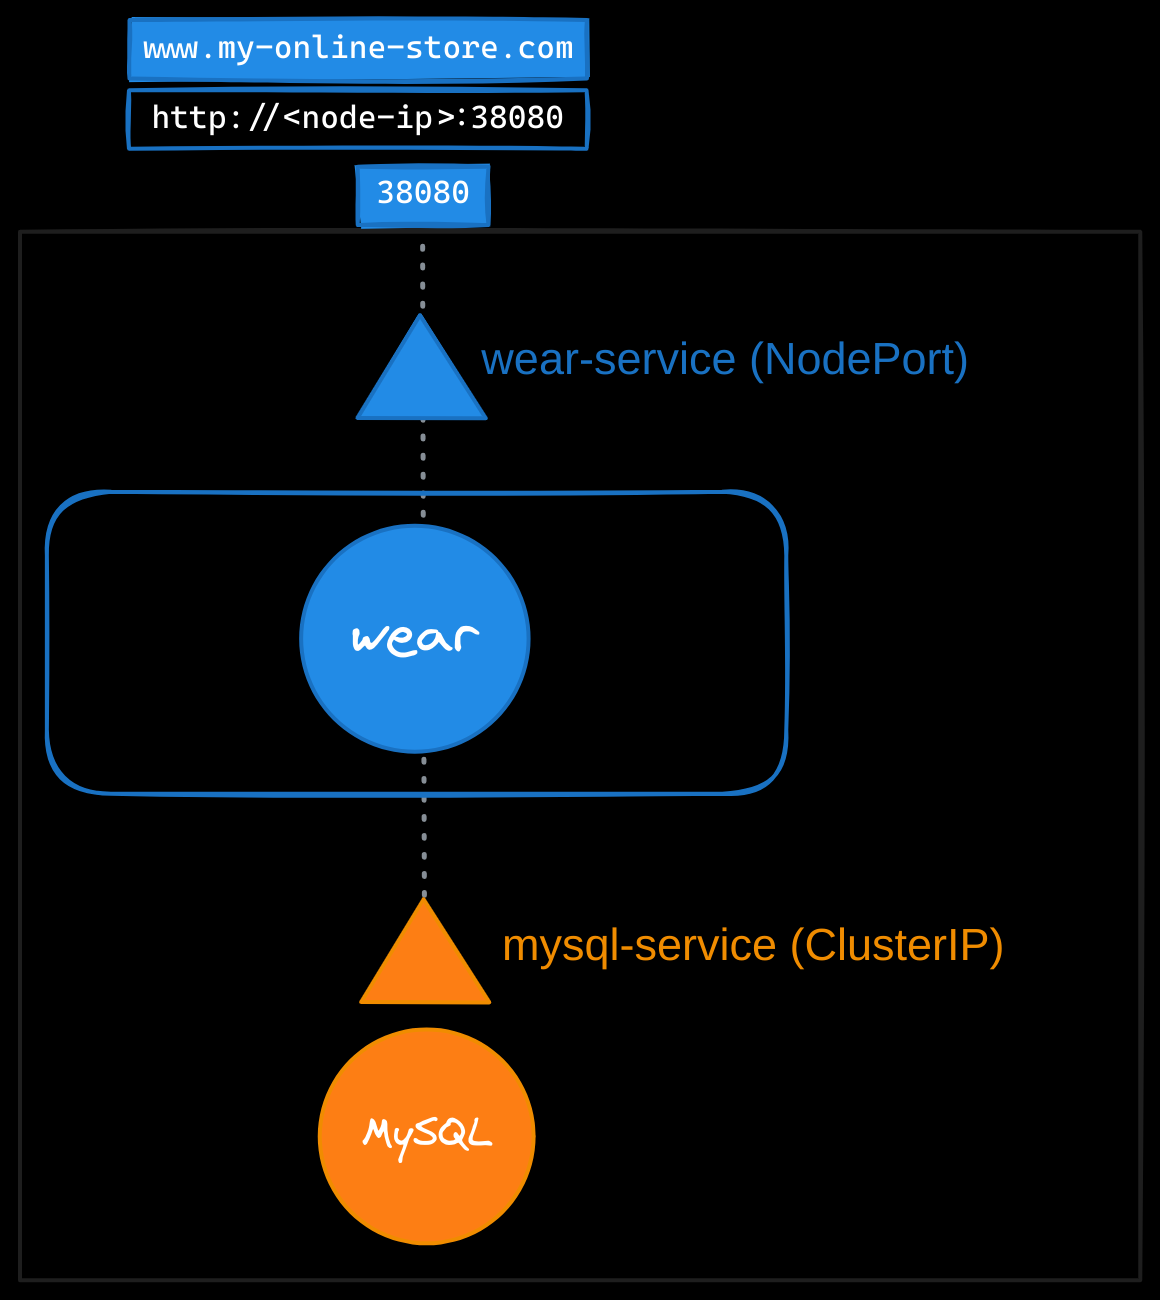
Now, users can access your application at http://<node-ip>:38080. To handle growing traffic, you scale your application by increasing the number of pod replicas. The service ensures traffic is load-balanced across all the pods.
The Need for a Better Approach
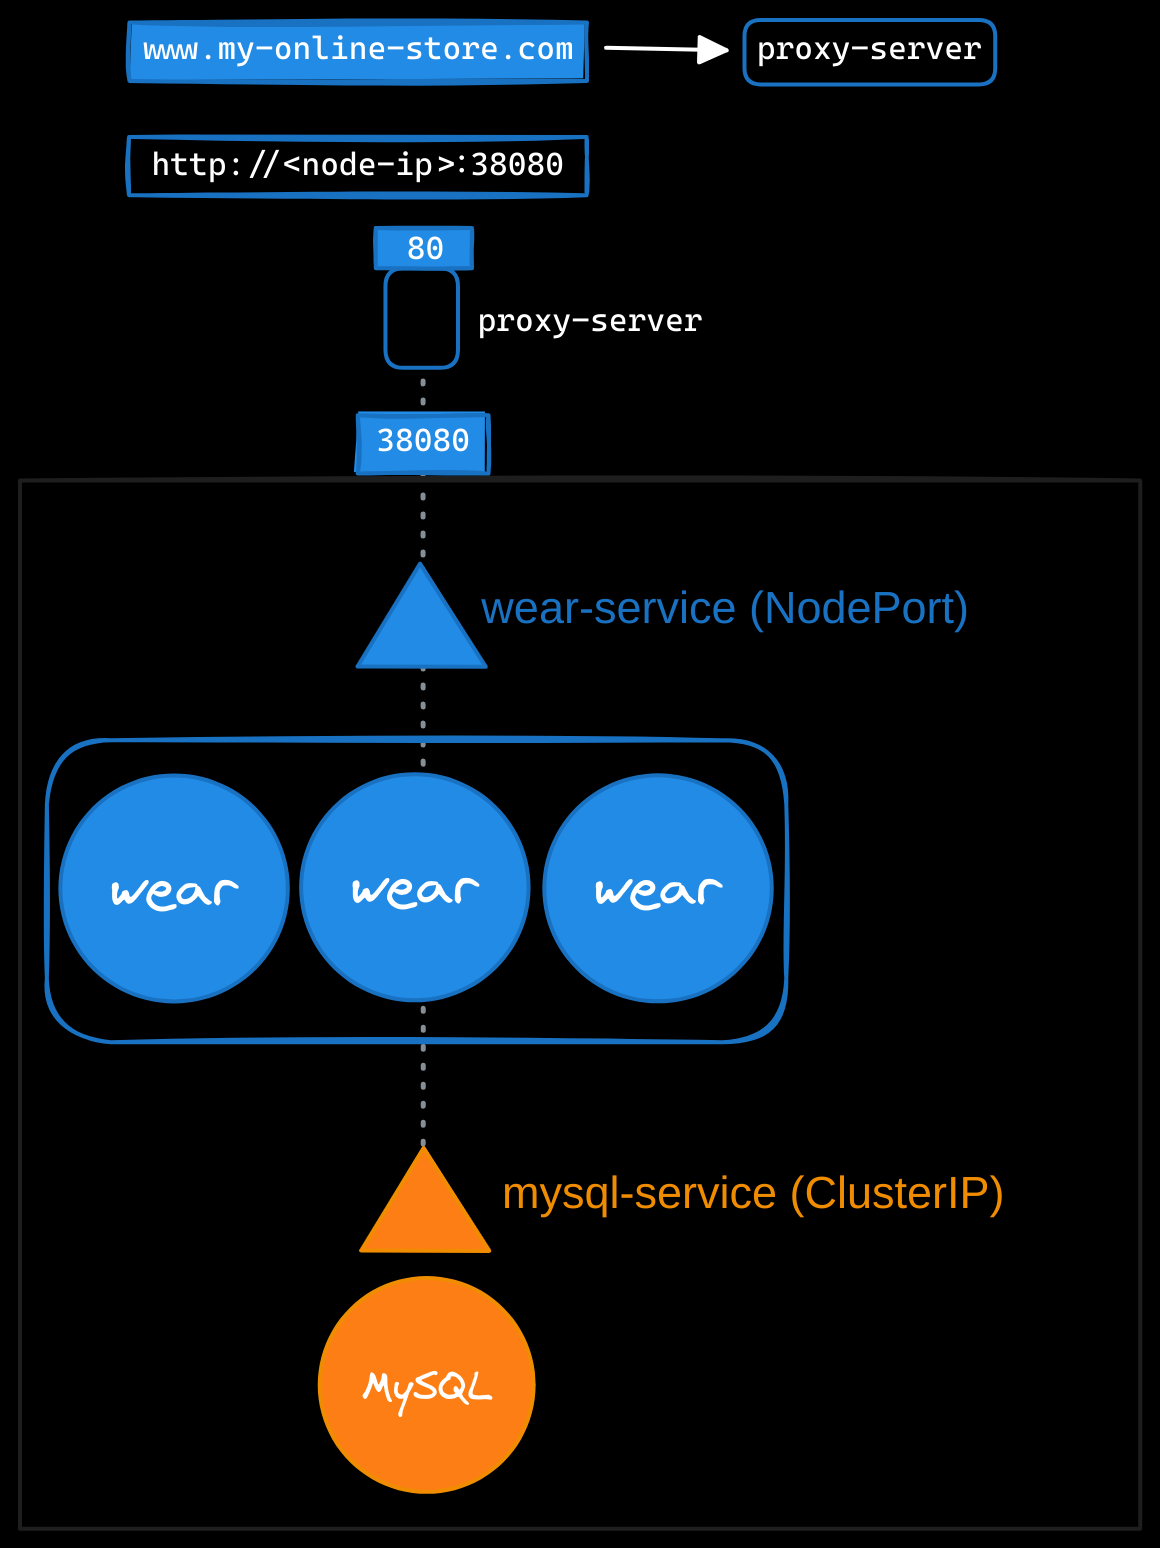
In production, you don’t want users to rely on IP addresses and port numbers. To simplify access, you configure a DNS server to point to the node IPs, allowing users to access the application at myonlinestore.com:38080. However, you still want to eliminate the need for a port number. To achieve this, you introduce a proxy server that forwards requests from port 80 to 38080. Now users can access your application simply via myonlinestore.com.
Leveraging Load Balancers in the Cloud
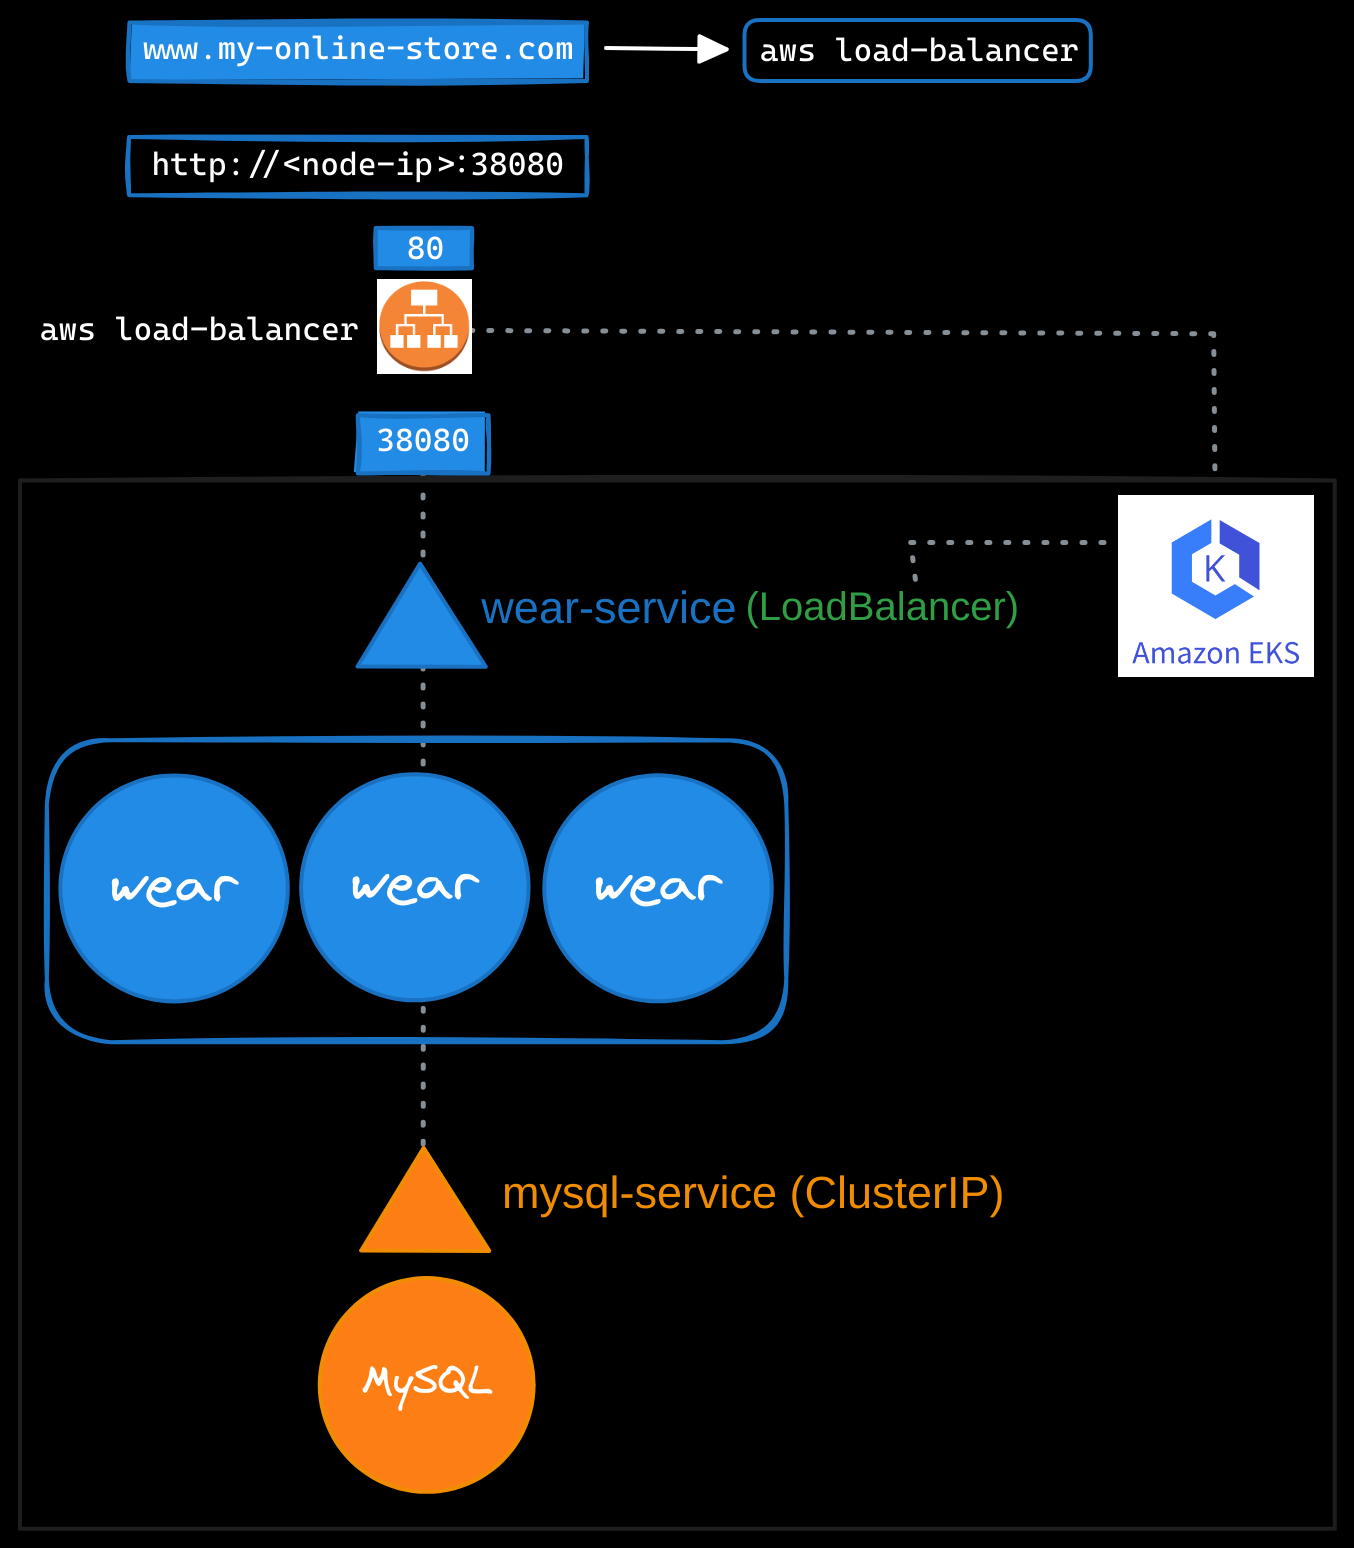
If you use a public cloud environment like Amazon Web Services, you can create a LoadBalancer service to expose your application externally. While Kubernetes provisions a cloud-based load balancer, such as an NLB or ALB, that provides an external IP for your application, it internally uses a NodePort service to route traffic from the load balancer to the nodes and then to the pods. This process is abstracted from users, who only interact with the load balancer’s external IP or DNS. You can configure your DNS to point to this IP, enabling users to access the application at myonlinestore.com.
Scaling Beyond a Single Service
As your business grows, you might introduce additional services. For example, suppose you want to make your original application accessible at myonlinestore.com/wear, while your developers have created a completely separate video streaming application, accessible at myonlinestore.com/watch. Although the new application has nothing to do with the original one, you want to share the same Kubernetes cluster resources. To do this, you deploy the new application as a separate deployment within the same cluster.
You create a LoadBalancer service called video-service, and Kubernetes assigns port 38282 for this service. It also provisions a new cloud-based load balancer with a unique IP address for the video service. While this setup works, you now have two separate load balancers, one for each application. And to route user traffic based on the URL they type (/wear for the original application and /watch for the video service), you would need yet another proxy or load balancer that can redirect traffic based on URLs. Every time you introduce a new service, this setup would require reconfiguring the load balancer.
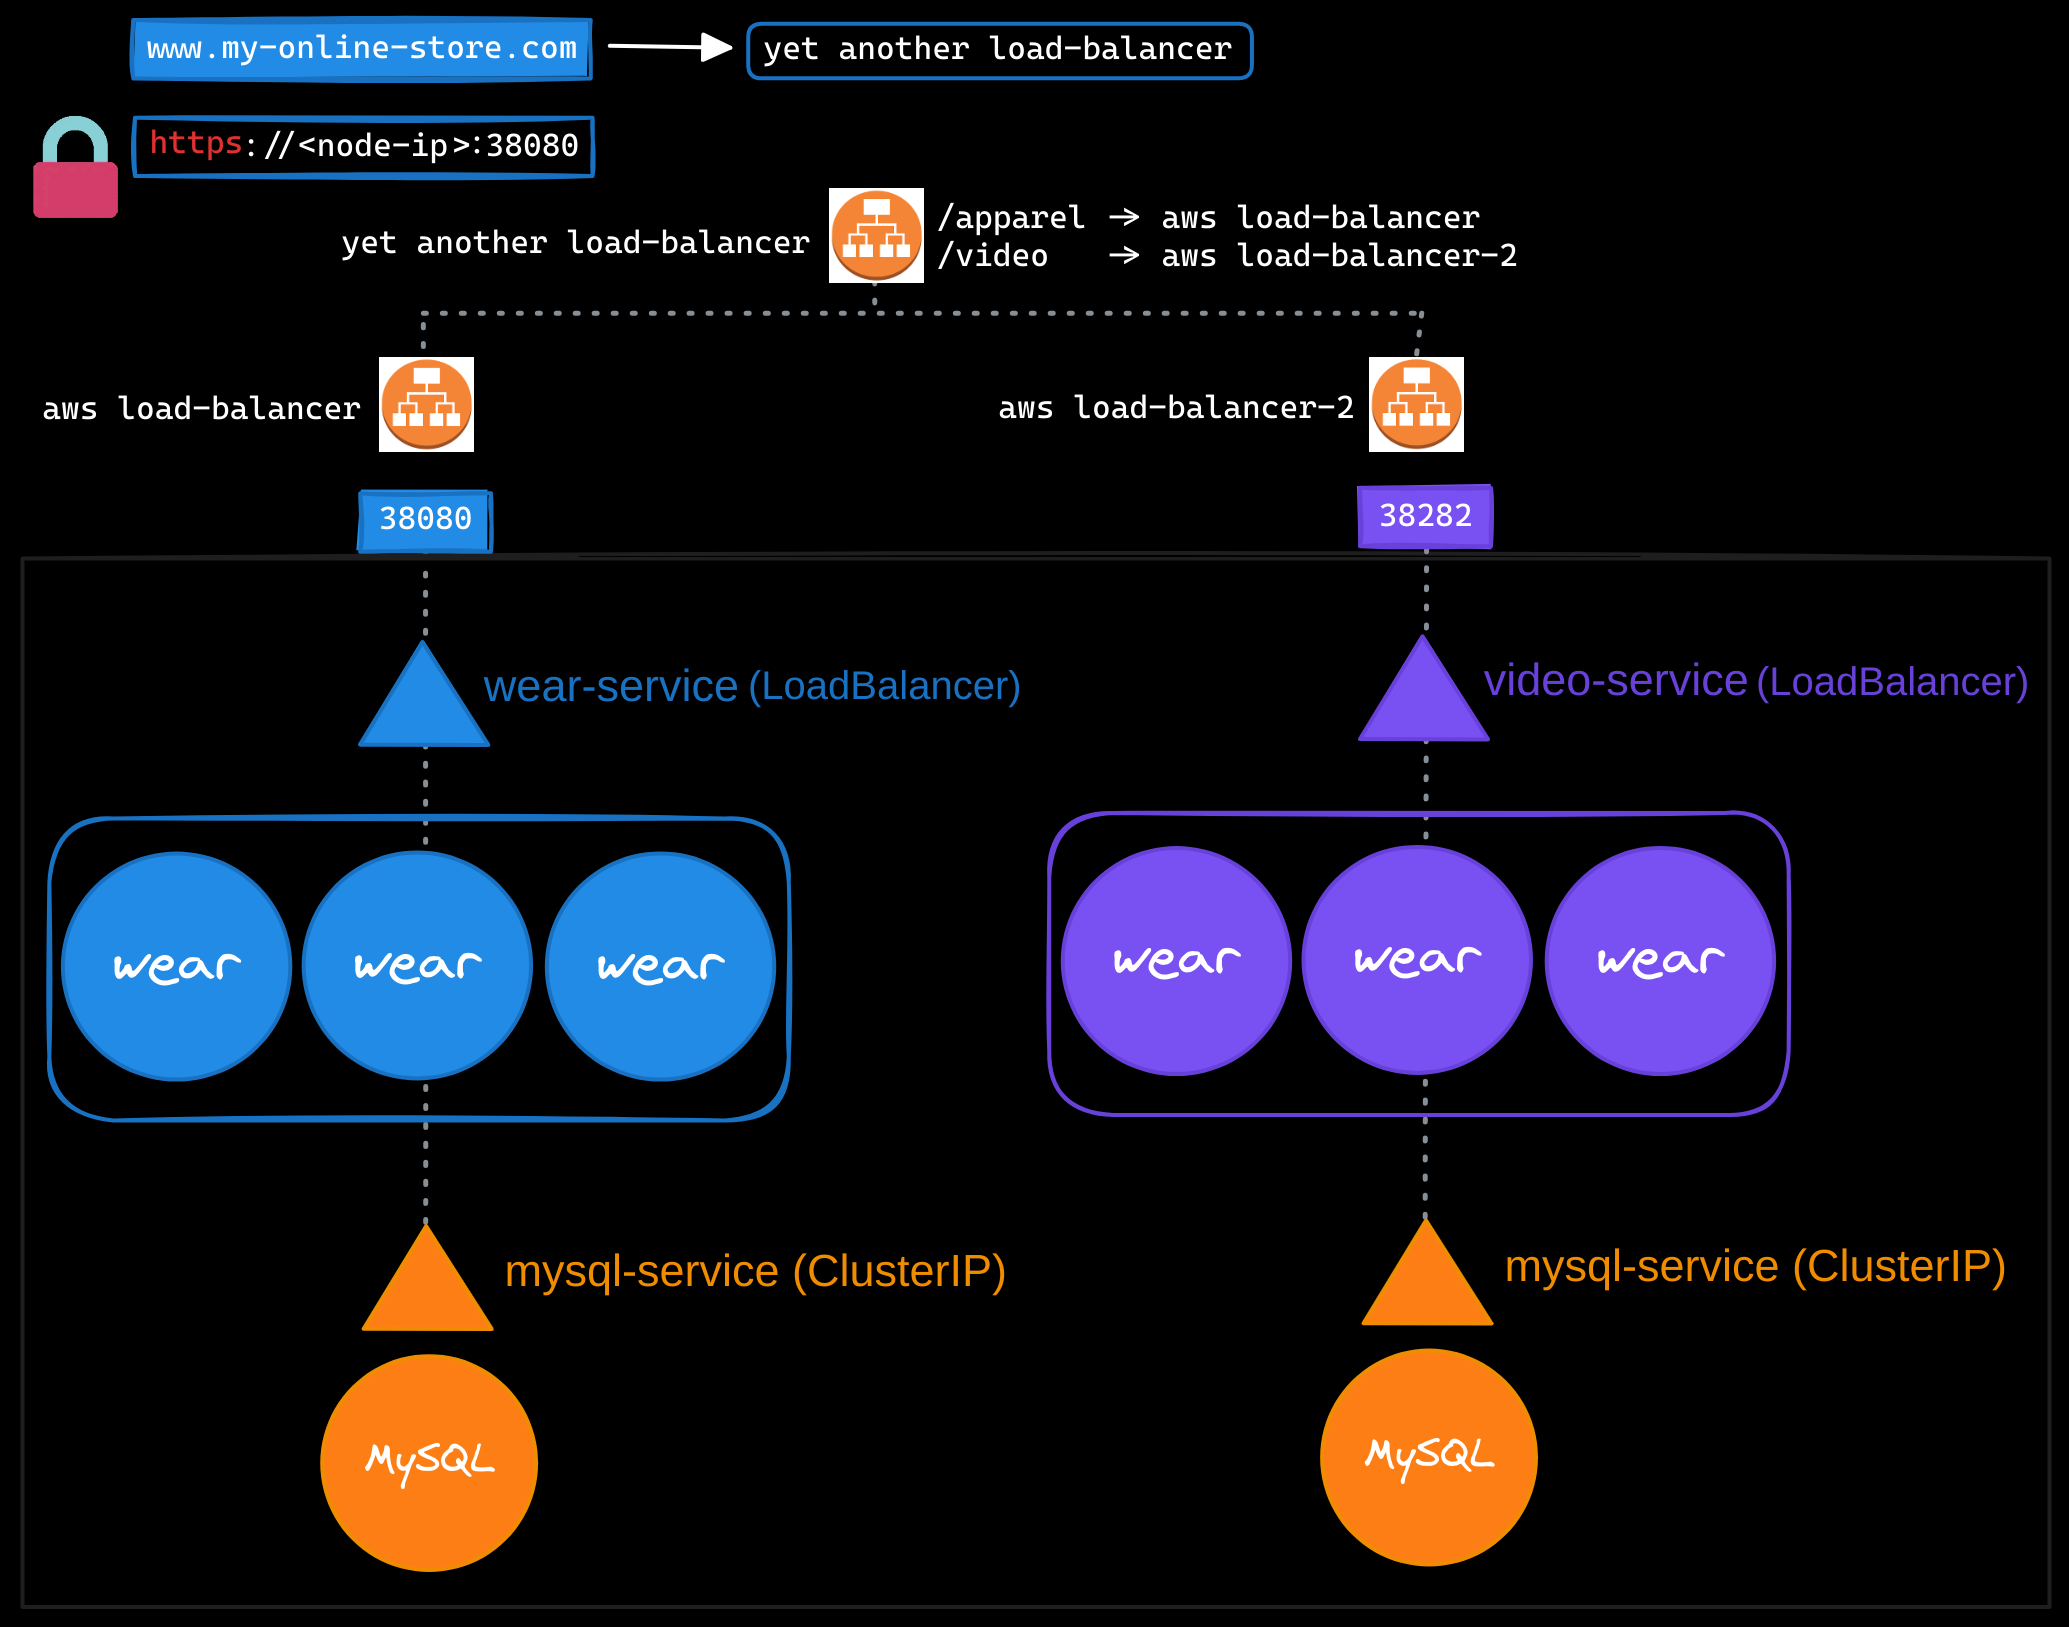
Additionally, you need to configure SSL for secure access (HTTPS), and deciding where to implement it—at the application level, load balancer, or proxy server—adds complexity. Since each load balancer incurs additional costs, managing multiple load balancers can quickly inflate your cloud bill.
Simplifying Traffic Management with Ingress
Ingress simplifies managing external traffic by providing a single, externally accessible URL to route traffic to multiple services within a Kubernetes cluster. With ingress, you can define routing rules based on URL paths (e.g., /watch or /wear) or domain names (e.g., watch.myonlinestore.com or wear.myonlinestore.com). Additionally, ingress supports SSL/TLS termination, functioning as a Kubernetes-native layer 7 load balancer.
However, to make ingress accessible outside the cluster, you need to expose it through a NodePort service or a cloud-based load balancer.
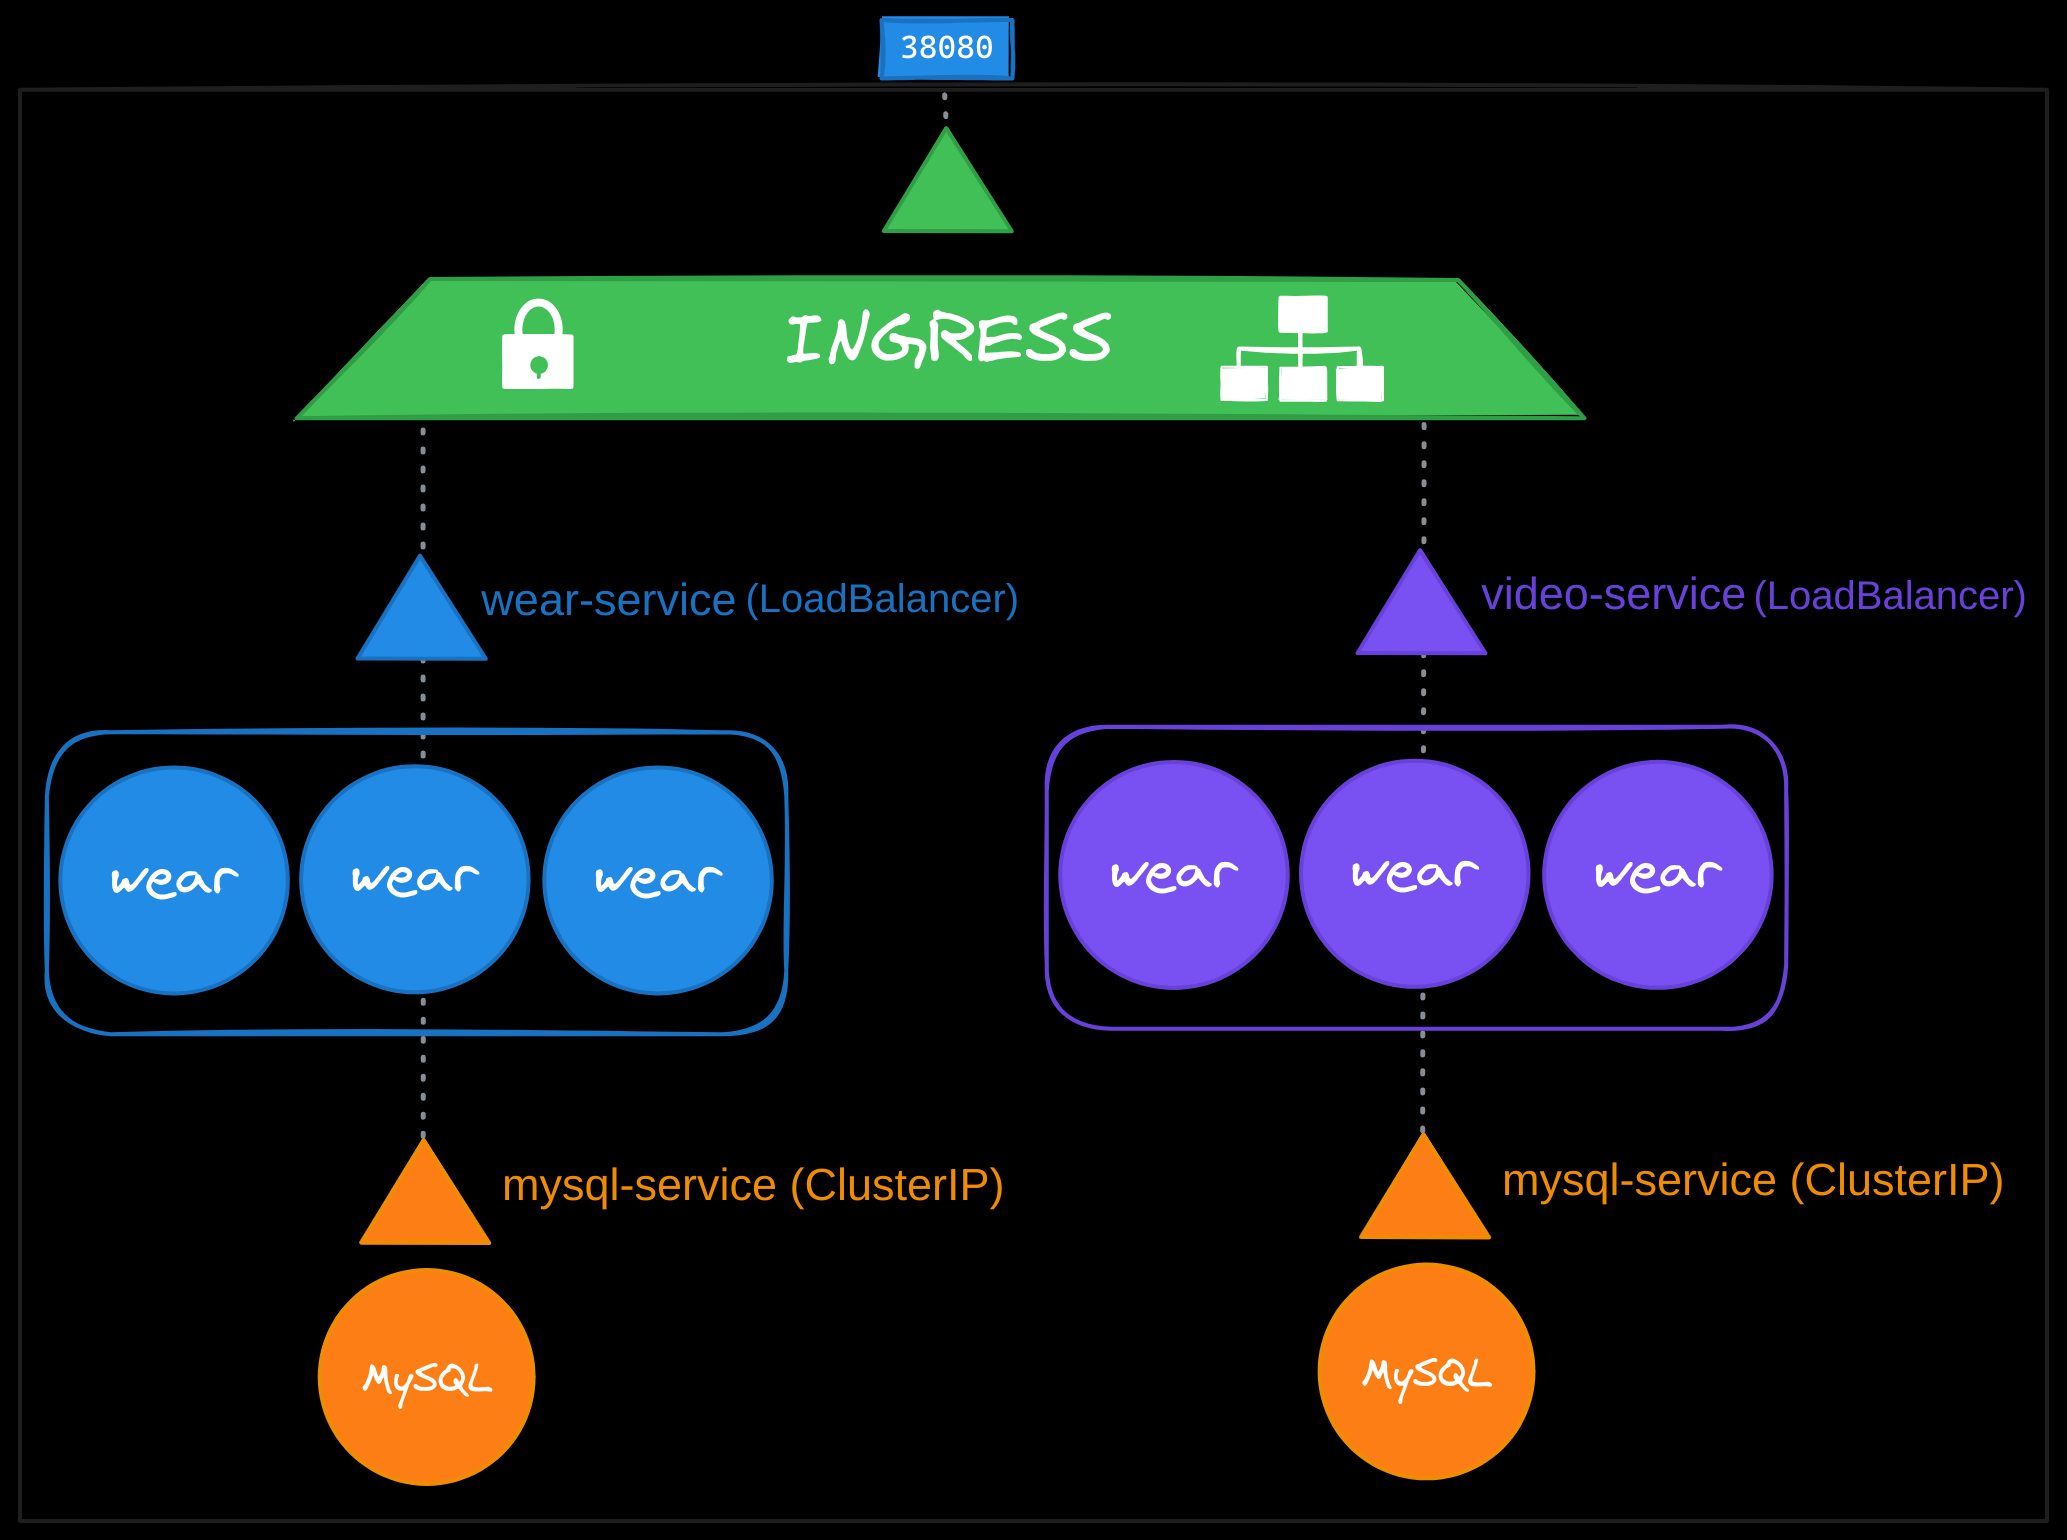
Deploying an NGINX Ingress Controller
Kubernetes does not include an ingress controller by default. You need to deploy one, such as NGINX, AWS ALB/NLB, GCE, HAProxy, Contour, Traefik, or Istio. The ingress controller monitors the cluster for ingress resources and configures its underlying load balancer to implement the defined routing rules.
Using NGINX as an example, we will deploy an ingress controller and expose it to handle external traffic.
Step 1: Define the Ingress Controller Deployment
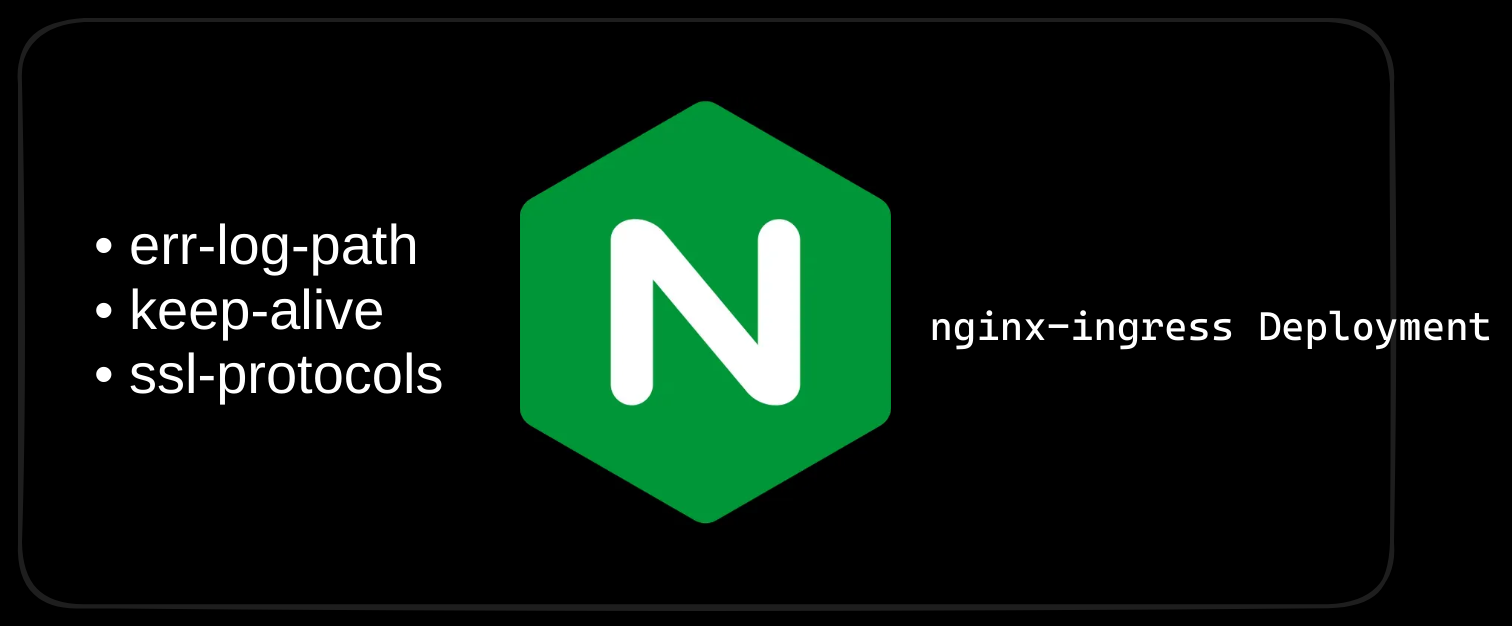
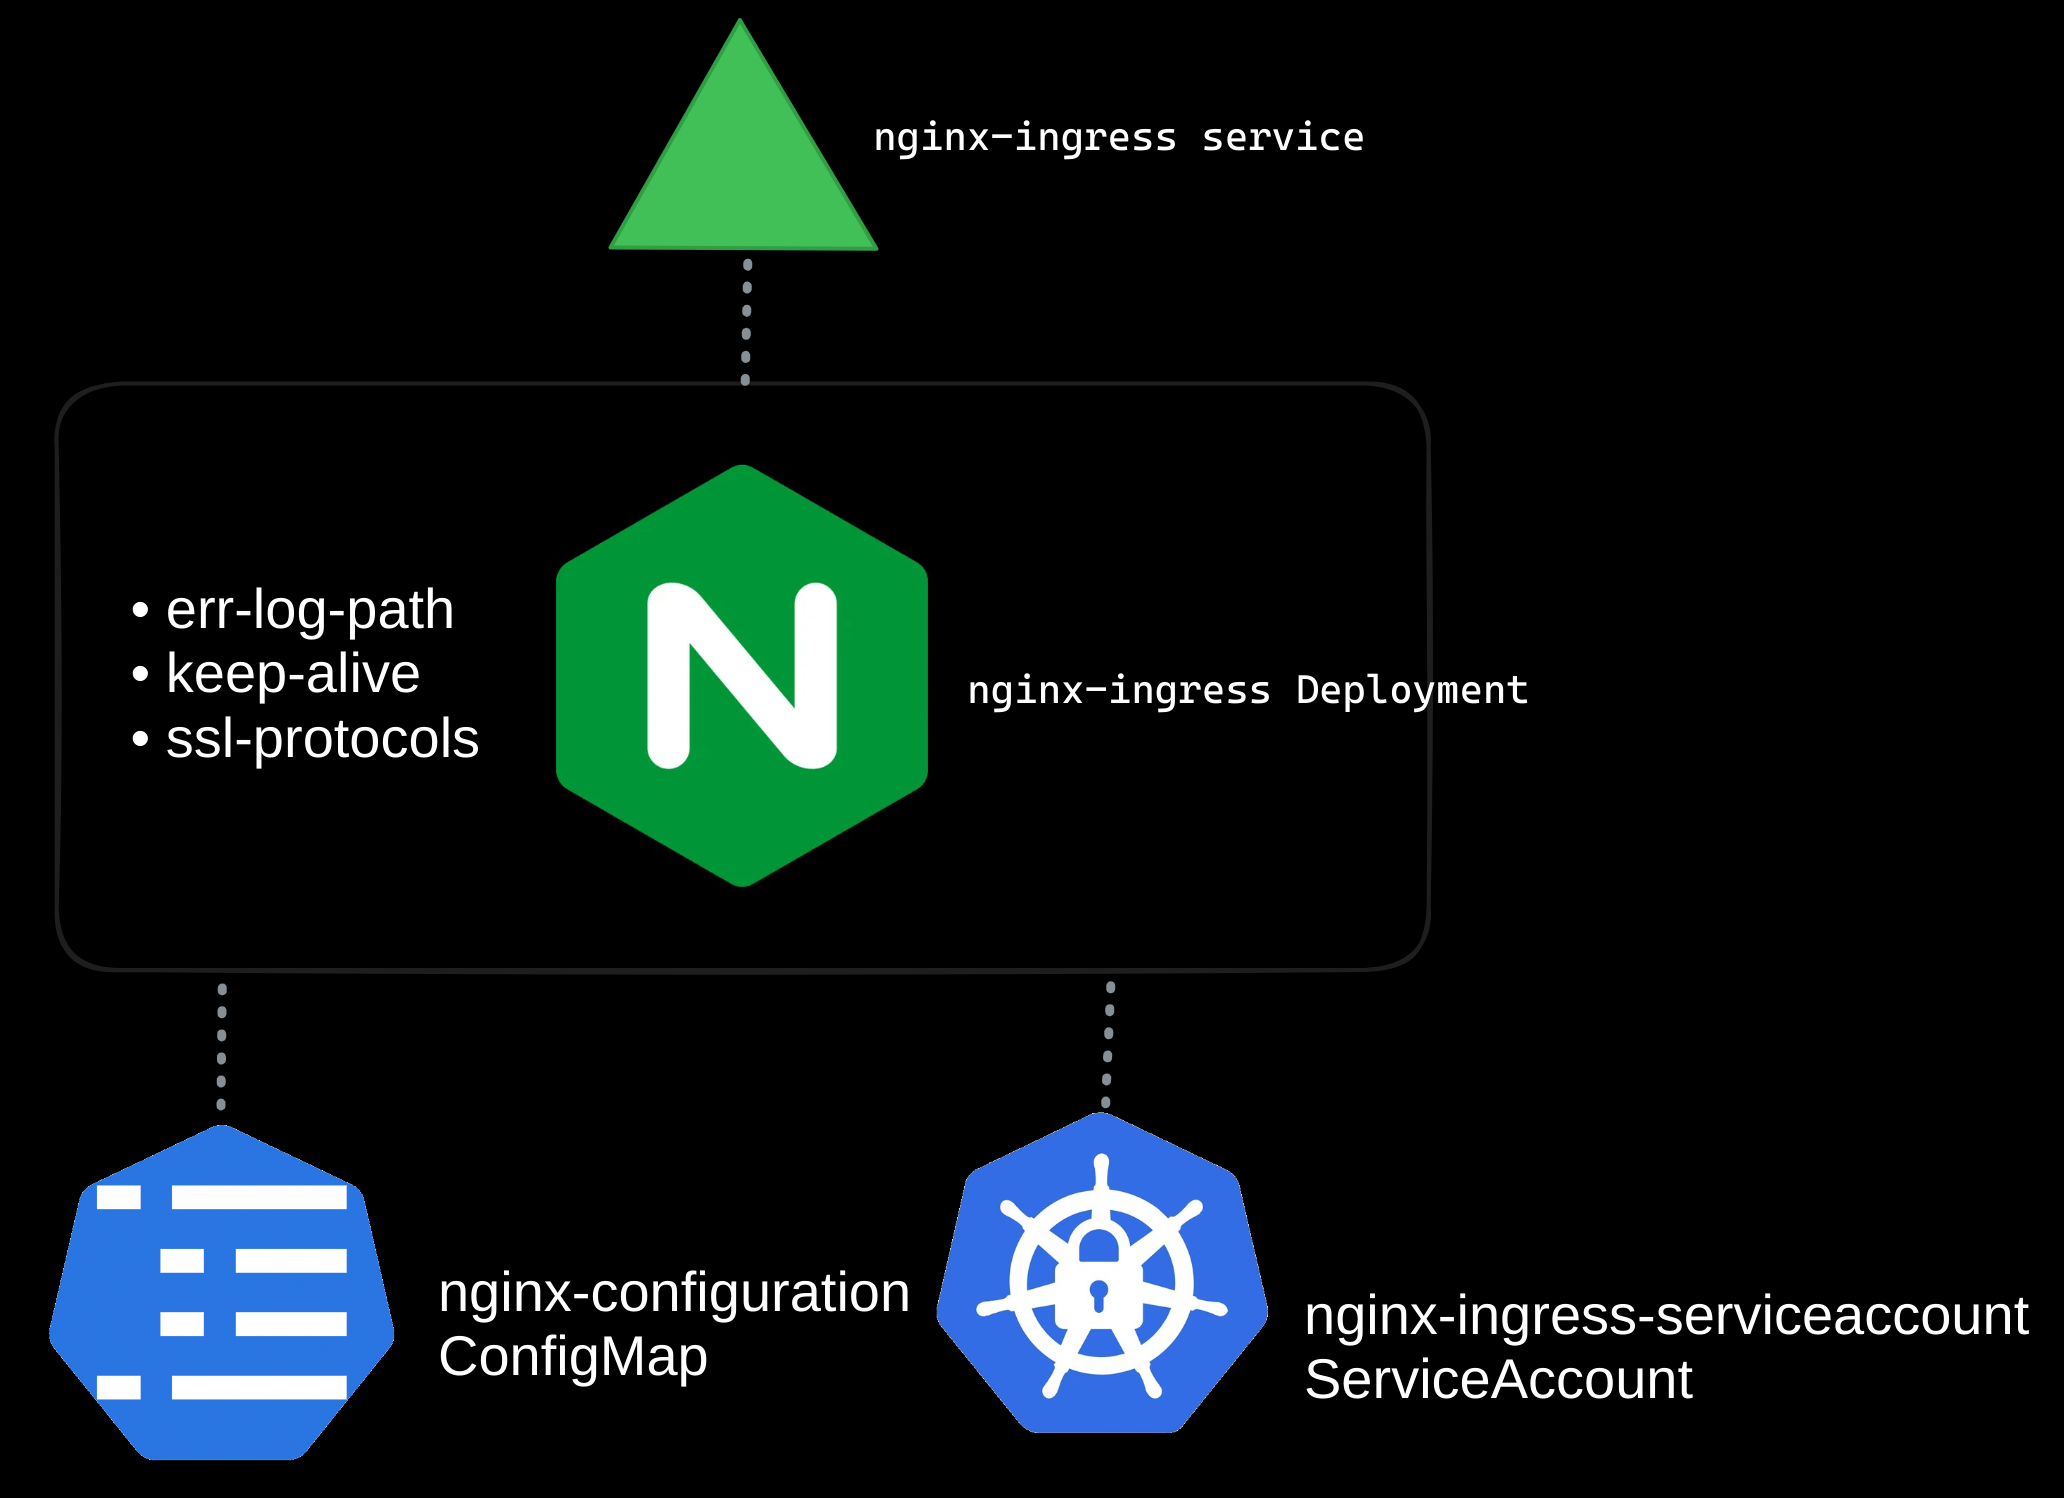
The ingress controller runs as a pod in a Kubernetes deployment. Here’s the YAML definition to deploy the NGINX ingress controller:
apiVersion: apps/v1
kind: Deployment
metadata:
  name: nginx-ingress-controller
spec:
  replicas: 1
  selector:
    matchLabels:
      name: nginx-ingress
  template:
    metadata:
      labels:
        name: nginx-ingress
    spec:
      containers:
        - name: nginx-ingress-controller
          image: quay.io/kubernetes-ingress-controller/nginx-ingress-controller:0.21.0
          args:
            - /nginx-ingress-controller
            - --configmap=$(POD_NAMESPACE)/nginx-configuration
          env:
            - name: POD_NAME
              valueFrom:
                fieldRef:
                  fieldPath: metadata.name
            - name: POD_NAMESPACE
              valueFrom:
                fieldRef:
                  fieldPath: metadata.namespace
          ports:
            - name: http
              containerPort: 80
            - name: https
              containerPort: 443
This deployment:
- Runs one replica of the ingress controller pod.
- Uses the nginx-ingress-controller image.
- Passes required arguments to configure the controller.
- Dynamically retrieves the pod’s name and namespace using environment variables.
- Opens ports
80(HTTP) and443(HTTPS) for external traffic.
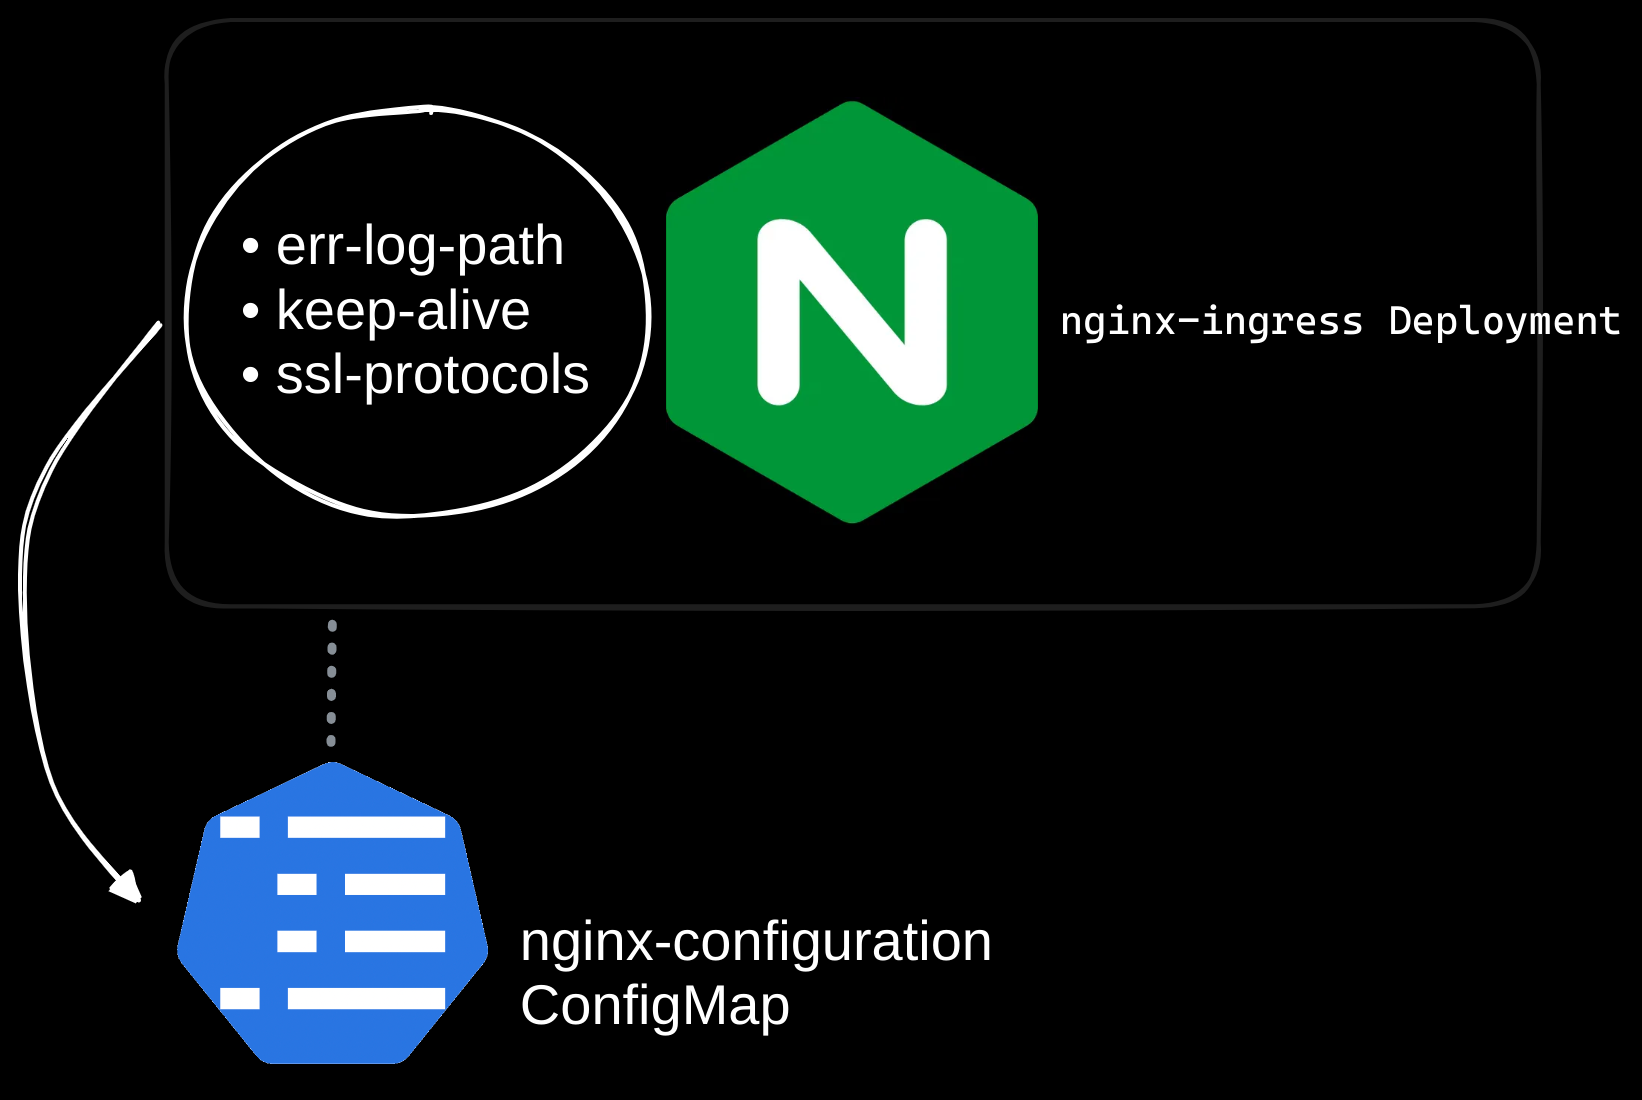
Step 2: Configure a ConfigMap for NGINX
The NGINX ingress controller uses a ConfigMap to store configuration data such as SSL settings, log paths, and session timeouts. Initially, the ConfigMap can be blank, but it simplifies future updates without modifying the deployment.
apiVersion: v1
kind: ConfigMap
metadata:
  name: nginx-configuration
data:
  # Path for error logs
  err-log-path: "/var/log/nginx/error.log"

  # Keep-alive timeout in seconds
  keep-alive: "75"

  # SSL protocols to support
  ssl-protocols: "TLSv1.2 TLSv1.3"
Step 3: Expose the Ingress Controller
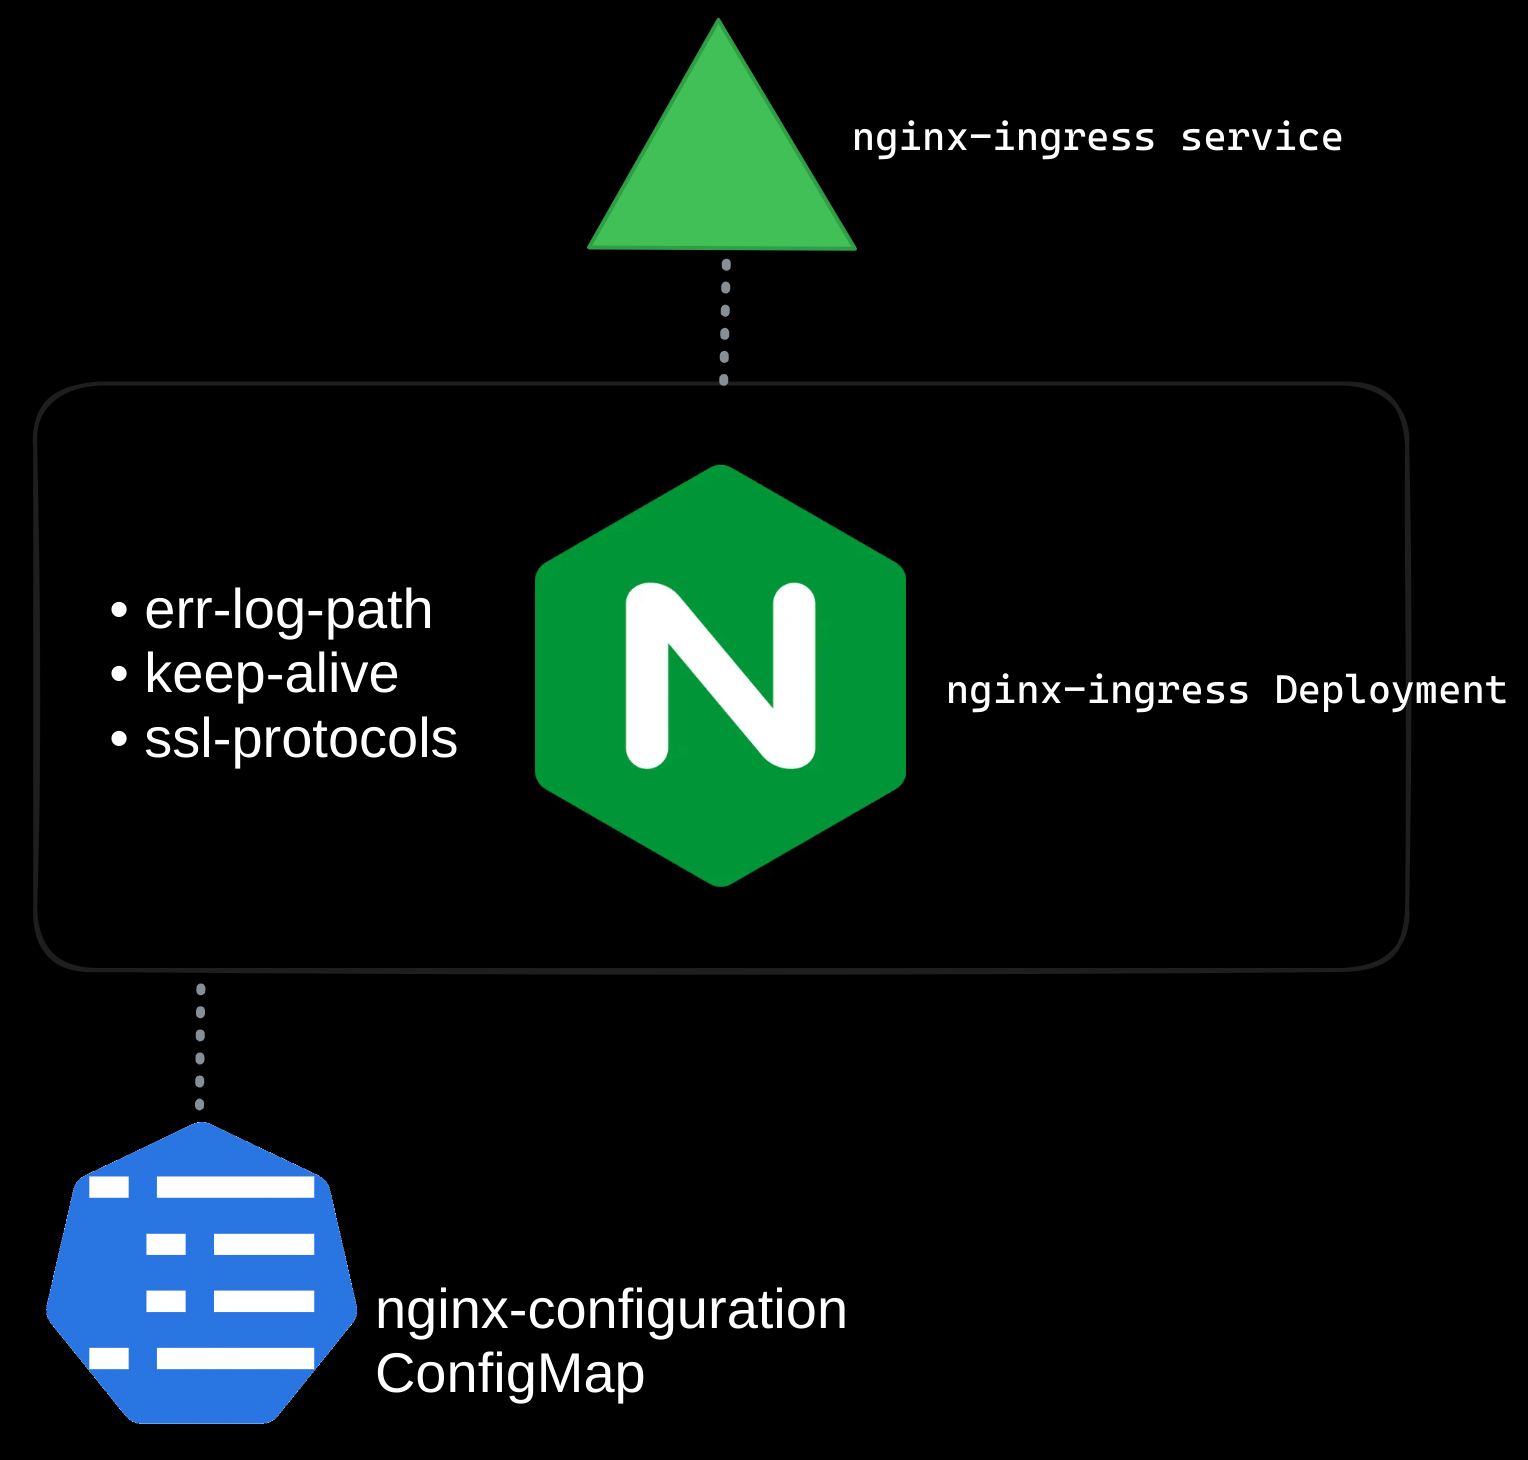
To expose the ingress controller to external traffic, create a NodePort service:
apiVersion: v1
kind: Service
metadata:
  name: nginx-ingress
spec:
  type: NodePort
  ports:
    - port: 80
      targetPort: 80
      protocol: TCP
      name: http
    - port: 443
      targetPort: 443
      protocol: TCP
      name: https
  selector:
    name: nginx-ingress
This service forwards traffic from external sources to the ingress controller’s pods, enabling the controller to process ingress rules.
Step 4: Grant Permissions
The ingress controller requires a service account to monitor ingress resources and manage configurations dynamically. While the example below provides basic permissions, you will also need to configure Roles, ClusterRoles, RoleBindings, and ClusterRoleBindings based on your specific use case and authentication requirements.
apiVersion: v1
kind: ServiceAccount
metadata:
  name: nginx-ingress-serviceaccount
Note: For production environments, ensure you define the appropriate RBAC permissions to restrict access based on the principle of least privilege. Tailor Roles and ClusterRoles to match your ingress controller’s functionality and scope within your cluster. This will help minimize security risks by granting only the permissions necessary for the controller to operate, while preventing unauthorized access to sensitive resources.
Step 5: Creating Ingress Resources
Once the ingress controller is deployed and exposed, you can define ingress resources to specify routing rules on the controller. These rules determine how traffic is distributed based on paths or hostnames.
Example 1: Path-Based Routing
Route traffic based on URL paths: Used to direct traffic to different services within a Kubernetes cluster based on URL paths while using a single domain name.
apiVersion: networking.k8s.io/v1
kind: Ingress
metadata:
  name: example-ingress
spec:
  rules:
    - host: myonlinestore.com # Single host for all paths
      http:
        paths:
          - path: /wear # Requests to /wear are routed to the wear-service
            pathType: Prefix
            backend:
              service:
                name: wear-service
                port:
                  number: 80
          - path: /watch # Requests to /watch are routed to the watch-service
            pathType: Prefix
            backend:
              service:
                name: watch-service
                port:
                  number: 80
In this example:
- All traffic is directed to myonlinestore.com.
- Requests to myonlinestore.com/wear are routed to the wear-service.
- Requests to myonlinestore.com/watch are routed to the watch-service.
This approach is ideal for hosting multiple applications or components under a single domain, with distinct URL paths differentiating them (e.g., an online store and a video streaming service).
Example 2: Host-Based Routing
Route traffic based on domain names:
apiVersion: networking.k8s.io/v1
kind: Ingress
metadata:
  name: host-based-ingress
spec:
  rules:
    - host: wear.myonlinestore.com # Requests to this domain are routed to wear-service
      http:
        paths:
          - path: / # All paths (/) on this host are routed to wear-service
            pathType: Prefix
            backend:
              service:
                name: wear-service
                port:
                  number: 80
    - host: watch.myonlinestore.com # Requests to this domain are routed to watch-service
      http:
        paths:
          - path: / # All paths (/) on this host are routed to watch-service
            pathType: Prefix
            backend:
              service:
                name: watch-service
                port:
                  number: 80
In this example:
- Traffic to wear.myonlinestore.com is routed to the wear-service.
- Traffic to watch.myonlinestore.com is routed to the watch-service.
This method is suitable when you need to host multiple services or applications with unique subdomains, providing a more isolated and specific entry point for each service.
Example 3: Default Backend Configuration
When traffic does not match any of the rules defined in an Ingress resource, Kubernetes can route the request to a default backend.
apiVersion: networking.k8s.io/v1
kind: Ingress
metadata:
  name: default-backend-ingress
spec:
  defaultBackend:
    service:
      name: default-backend-service # The service handling unmatched traffic
      port:
        number: 80
  rules:
    - host: myonlinestore.com
      http:
        paths:
          - path: /wear
            pathType: Prefix
            backend:
              service:
                name: wear-service
                port:
                  number: 80
          - path: /watch
            pathType: Prefix
            backend:
              service:
                name: watch-service
                port:
                  number: 80
The default backend is typically used to:
- Display a custom error page.
- Serve a generic message.
- Return a 404 Not Found response for unmatched requests.
This is especially useful to handle edge cases where users might access invalid paths or domains.
Summary
With an NGINX ingress controller in place, managing external traffic becomes significantly simpler. By using ingress resources, you can route requests efficiently to multiple services in your cluster based on URL paths or domain names, all while centralizing SSL/TLS termination. This setup eliminates the complexity of multiple load balancers, reduces costs, and provides a scalable solution for handling traffic. Ingress ensures a seamless user experience by consolidating traffic management into a single, Kubernetes-native approach.