In this post, we get introduced to network namespaces in Linux. Network namespaces are used by containers like Docker to implement network isolation.
Not to be confused with Kubernetes (K8s) namespaces, which are used to organize and manage resources within a Kubernetes cluster, Linux network namespaces provide network isolation at the system level, ensuring that each container or process operates in its own private network environment.
Understanding Namespaces
Linux network namespaces are a feature that allows you to create isolated network environments within a single Linux kernel. This means that each container or process can have its own network stack, including unique IP addresses, routing tables, and network interfaces, all independent of each other.
We’ll start with a simple host. Containers are separated from the underlying host using namespaces. Imagine your host is a large office building:
- Each namespace is like a private office within the building, assigned to different employees or teams.
- Each office has its own door and walls, providing privacy and separation.
- The people inside each office can only see and access what’s inside their own office—they can’t see or interact with other offices directly. To them, it feels like they are the only ones in the building.

However, as the building manager, you have master keys and can see into all offices and manage them as needed. If necessary, you can also create connections between specific offices, allowing them to communicate directly.
Creating and Managing Containers
When you create a container, you want to make sure that it is isolated, that it does not see any other processes on the host or any other containers. So we create a special room for it on our host using a namespace. As far as the container is concerned, it only sees the processes run by it and thinks that it is on its own host.
- The underlying host, like the building manager in our analogy above, has visibility into all of the processes, including those running inside the containers.
- The isolated processes can be seen when you list the processes from within the container:
$ ps aux You see a single process with a process ID of 1.
When you list the same processes as a root user from the underlying host however, you see all the other processes, along with the process running inside the container, this time with a different process ID.
- It’s the same process running with different process IDs inside and outside the container. That’s how namespaces work.
Network Isolation
When it comes to networking, our host has its own interfaces that connect to the local area network (LAN), along with its own routing and ARP tables containing network information.
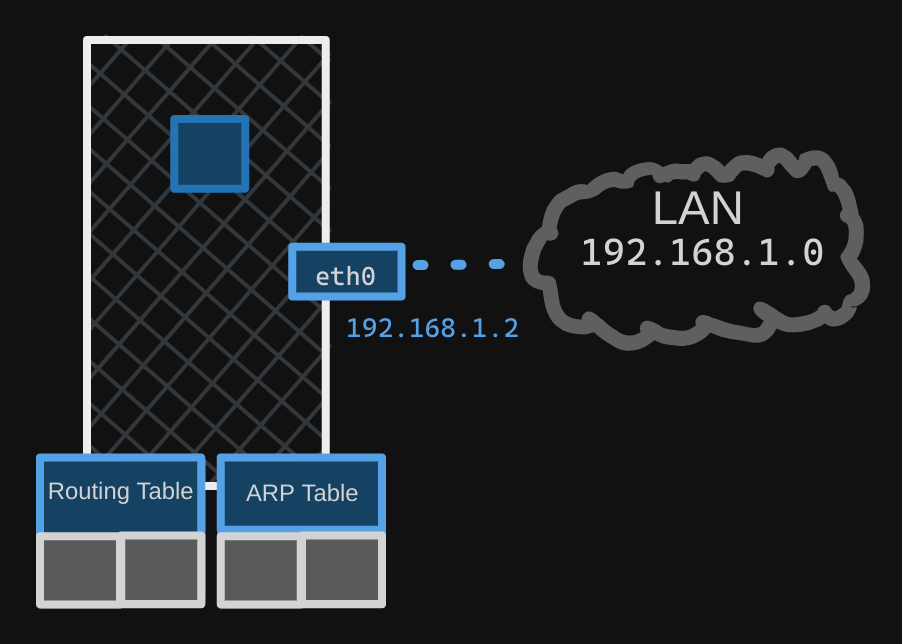
To isolate these details from the container, we create a network namespace for it when the container is created. This ensures that the container has no visibility into any network-related information on the host.
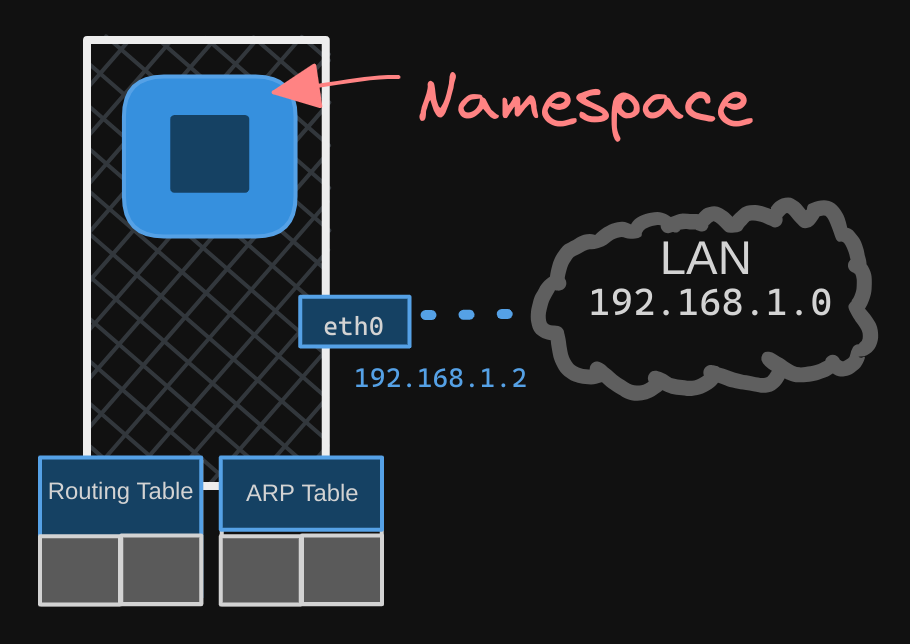
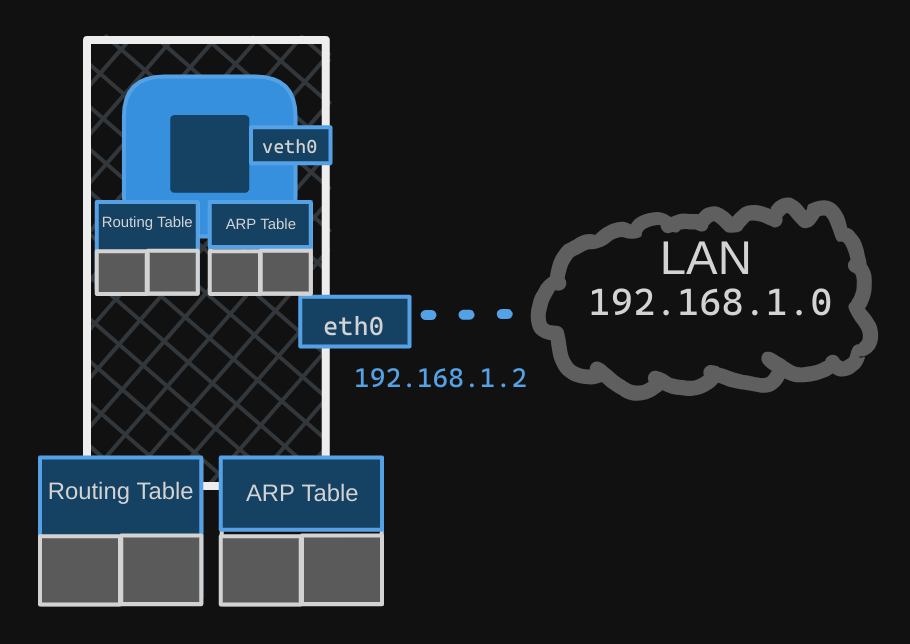
Within its namespace, the container can have its own virtual interfaces, as well as its own routing and ARP tables, completely independent of the host.
Creating a Network Namespace
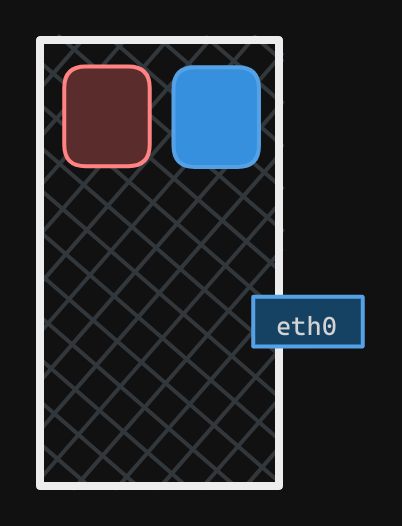
To create a new network namespace on a Linux host, use the $ ip netns add <namespace_name> command. In this case, we create two network namespaces, one red and one blue.
$ ip netns add red
$ ip netns add blue
To list the network namespaces:
$ ip netns
To list the interfaces on my host:
$ ip link
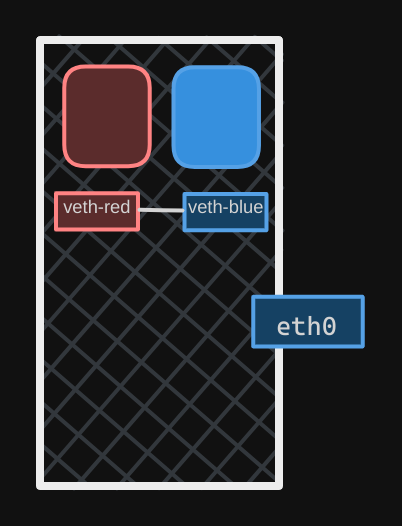
When I check my host’s network interfaces, I see two interfaces listed, the loopback interface and another interface identified as “80”.
- The loopback interface is used for internal communication within the host, typically with the IP address
127.0.0.1. - The “80” interface is an additional network interface that the host uses to connect to other networks, such as an Ethernet interface. This interface is only on the host; We should not see this interface when we view interfaces in the red/blue namespaces.
To view interfaces within a specific namespace, e.g. the red namespace, use:
$ ip netns exec red ip link
Equivalently, you can use:
$ ip -n red link
Both of these are the same. The second one is simpler, but remember this only works if you intend to run the ip command inside the namespace.
When you run one of the two commands, only lists the loopback interface; you cannot see the 80 interface on the host. So with namespaces, we have successfully prevented the container from seeing the host interface.
- The same is true with the ARP table. If you run the
arpcommand on the host, you see a list of entries, but if you run it inside the container, you see no entries. - And the same for the routing table, using
$ ip netns exec red route
Establishing Connectivity Between Namespaces
As of now, these network namespaces have no network connectivity; they have no interfaces of their own and they cannot see the underlying host network.
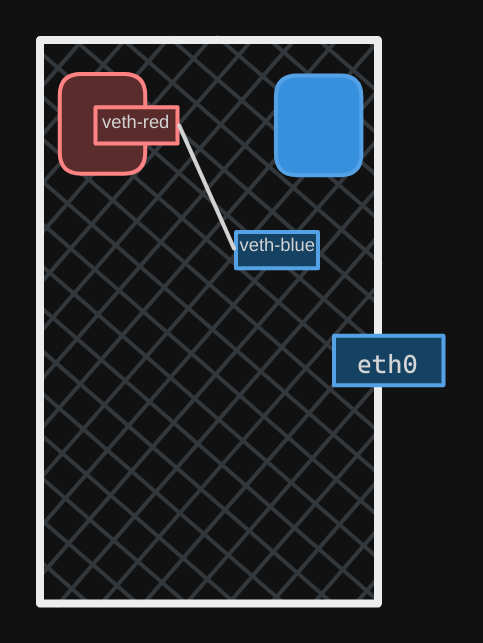
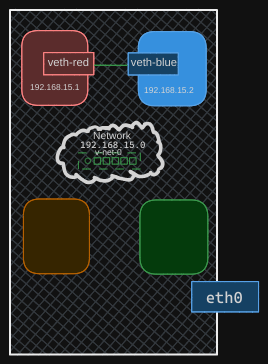
Let’s first look at establishing connectivity between the namespaces themselves. Just like how we would connect two physical machines together using a cable to an internet interface on each machine, you can connect two namespaces together using a virtual ethernet pair, or a virtual pipe.
- To create the pipe, run the
ip link addcommand with a type set tovethand specify the two endsveth redandveth blue.
$ ip link add veth-red type veth peer name veth blue
The next step is to attach each interface to the appropriate namespace. Use the command $ ip link set veth-red netns red to do that.
Similarly, attach the blue interface to the blue namespace using $ ip link set veth-blue netns blue.
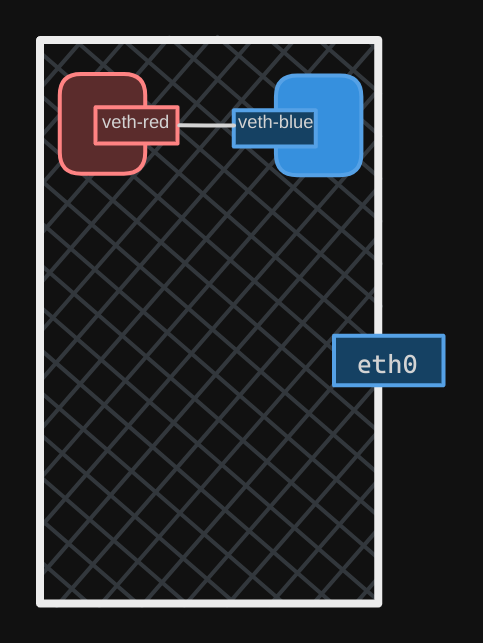
We can then assign IP addresses to each of these namespaces. We will use the usual ip addr command to assign the IP address, but within each namespace.
$ ip -n red addr add 192.168.15.1 dev veth red
$ ip -n blue addr add 192.168.15.2 dev veth blue
We then bring up the interface using ip link set <namespace> up for each device within the respective namespaces.
$ ip -n red link set veth-red up
$ ip -n blue link set veth-blue up
The links are up and the namespaces can now reach each other. Try a ping from the red namespace to reach the IP of the blue.
$ ip netns exec red ping 192.168.15.2

If you look at the ARP table on the red namespace, you see it’s identified its blue neighbor at 192.168.15.2 with a MAC address.
$ ip netns exec red arp

Similarly, if you list the ARP table on the blue namespace, you see it’s identified its red neighbor.
$ ip netns exec blue arp

If you compare this with the ARP table of the host, you see that the host ARP table has no idea about these new namespaces we have created, and no idea about the interfaces we created in them.
Connecting Multiple Namespaces
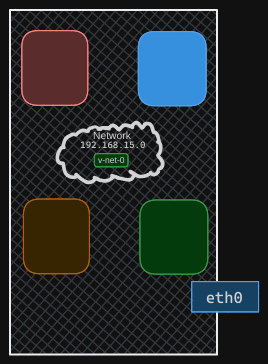
When you only have two namespaces, setting up communication between them is straightforward. But what if you have more? How do you ensure they can all communicate with each other? Similar to the physical world, you create a virtual network within your host. To create this network, you need a switch. For a virtual network, you need a virtual switch.
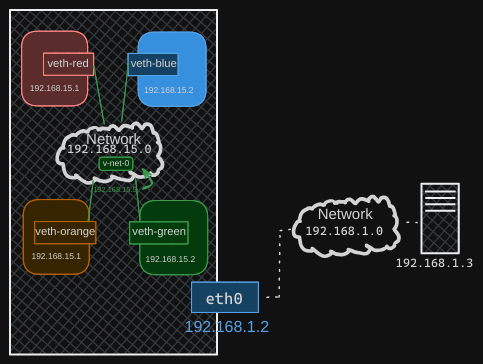
Here’s how you do it: Create a virtual switch within your host and connect the namespaces to it. There are several options for creating a virtual switch, such as the native Linux bridge or Open vSwitch. In this example, we’ll use the Linux bridge option to create a solution that will look like so:
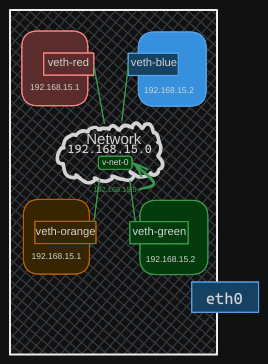
We can also use the previous namepsace commands to create a green and orange namespace, To create an internal bridge network, add a new interface to the host using the ip link add command with the type set to bridge, and we will name it v-net-0.
$ ip link add v-net-0 type bridge
To the host, this new interface is just another network interface, similar to the eth0 interface. It will appear in the output of the $ ip link command along with the other interfaces. Initially, it will be down, so you’ll need to bring it up using:
$ ip link set dev v-net-0 up
For now, I have represented the bridge or switch to be like the switches in the previous posts, but going forward I will represent the virtual switch with a more legible icon.
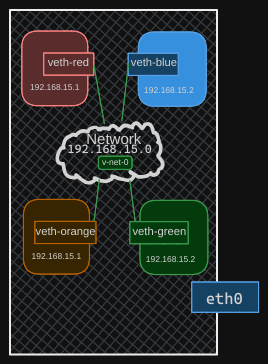
Connecting Namespaces to the Virtual Switch
For the namespaces, this interface acts like a switch they can connect to. Think of it as an interface for the host and a switch for the namespaces. The next step is to connect the namespaces to this new virtual network switch.
Previously, we created a cable, or the veth pair, with veth-red on one end and veth-blue on the other to connect the two namespaces directly. Now, we need to connect all namespaces to the bridge network, so we need new cables. The old cable is no longer needed, so we will delete it using the ip link delete command. Deleting one end of the link automatically deletes the other end since they are a pair.
Let’s create new cables to connect the namespaces to the bridge. Run the ip link add command to create a pair with veth-red on one end, like before, but name the other end veth-red-br to indicate it connects to the bridge network. This naming convention helps us easily identify the interfaces associated with the red namespace. Similarly, create a cable to connect the blue namespace to the bridge network.
With the cables ready, it’s time to connect them to the namespaces. To attach one end to the red namespace, run the ip link set veth-red netns red command. To attach the other end to the bridge network, run the ip link set veth-red-br master Vnet0 command. Follow the same procedure to connect the blue cable to the blue namespace and the bridge network.
Now, set IP addresses for these links and turn them up. Use the same IP addresses as before: 192.168.15.1 and 192.168.15.2. Finally, turn the devices up. The containers can now reach each other over the network.

Repeat this procedure to connect the remaining two namespaces to the same network. Now, all four namespaces are connected to our internal bridge network and can communicate with each other. They have IP addresses 192.168.15.1, 192.168.15.2, 192.168.15.3, and 192.168.15.4.
Establishing Connectivity Between Host and Namespaces
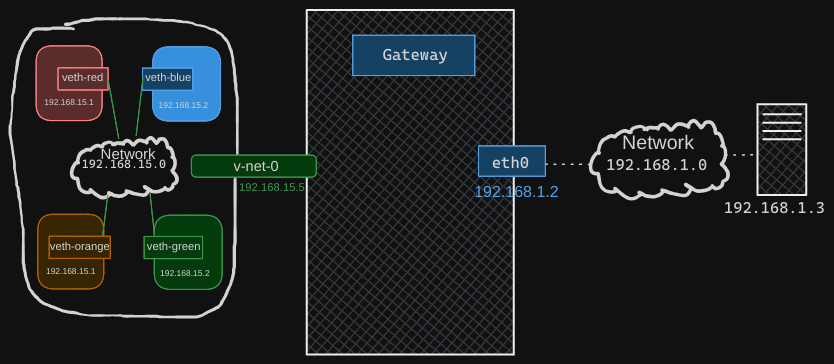
Recall from before that we assigned our host the IP address 192.168.1.2. If you try to reach one of the interfaces in these namespaces from your host, it won’t work because your host is on one network (192.168.1.0/24) and the namespaces are on another (192.168.15.0/24). But what if you really want to establish connectivity between your host and these namespaces?
Recall that the virtual switch is also a network interface for the host. Therefore, we do have an interface on the 192.168.15 network on our host. Since this is just another interface, all we need to do is assign an IP address to it so we can reach the namespaces through it. Use the ip addr add command to set the IP address 192.168.15.5 to this interface.
$ ip addr add 192.168.15.5/25 dev v-net-0
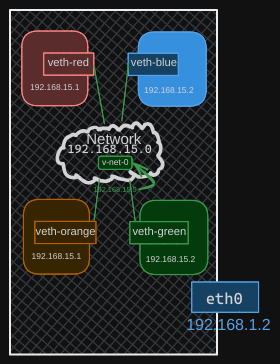
We can now ping the red namespace from our local host. Now remember, this entire network is still private and restricted within the host. From within the namespaces, you can’t reach the outside world nor can anyone from the outside world reach the services or applications hosted inside. The only door to the outside world is the ethernet port on the host.
Configuring Bridge for LAN Connectivity
To configure the bridge to reach the LAN network through the ethernet port, let’s assume there is another host on the LAN network with the address 192.168.1.3.
If you try to ping this host from within your namespaces, the blue namespace will see that you’re trying to reach a network at 192.168.1, which is different from the current network of 192.168.15. The namespace will check its routing table and, finding no information about the other network, will report that the network is unreachable.
Solution
To resolve this, you need to add an entry to the routing table to provide a gateway to the outside world. The gateway is a system on the local network that connects to another network. In this case, the gateway is your local host, which has an interface on the 192.168.15 network and also connects to the outside LAN network.
Let’s assume there is another host attached to our LAN network with the address 192.168.1.3. How can we reach this host from within our namespaces? What happens if we try to ping this host from the blue namespace? The blue namespace sees that it’s trying to reach a network at 192.168.1, different from its current network of 192.168.15. So it checks its routing table to find that network.
$ ip netns exec blue ping 192.168.1.3
The routing table has no information about the other network, so it returns an unreachable network message. Therefore, we need to add an entry to the routing table to provide a gateway to the outside world.
What is a system that has one interface on the 192.168.15 network (local to the blue namespace) and also connects to the outside LAN network? The logical view shows that it’s the local host with all these namespaces. Our local host has an interface to attach to the private network, allowing you to ping the namespaces. Thus, our local host is the gateway that connects the two networks together.
We can now add a row entry in the blue namespace to say route all traffic to the 192.168.1 network through the gateway at 192.168.15.5.
$ ip netns blue ip route add 192.168.1.0/24 via 192.168.15.5
Configuring Default Gateway
Remember, our host has two IP addresses: one on the bridge network at 192.168.15.5 and another on the external network at 192.168.1.2. Can you use either address in the route? No, because the blue namespace can only reach the gateway on its local network at 192.168.15.5. The default gateway should be reachable from your namespace when you add it to your route.
When you try to ping now, you no longer get the network unreachable message, but you still don’t get any response back from the ping. What might be the problem?
We discussed a similar situation in an earlier post where we tried to reach the external internet from our home network through our router. Our home network has internal private IP addresses that the destination network doesn’t know about, so they cannot reach back.
To resolve this, we need to enable NAT (Network Address Translation) on our host acting as a gateway so that it can send the messages to the LAN using its own address. This allows the destination network to respond correctly.
By setting up NAT on the gateway, it will translate the private IP addresses from the blue namespace to its own public IP address before sending them out. When the external host responds, the gateway will translate the response back to the original private IP address and deliver it to the blue namespace. This way, communication is successfully established.
Enabling NAT Functionality
So how do we add NAT functionality to our host? You should do that using IP tables. Add a new rule in the NAT IP table in the post routing chain to masquerade or replace the from address on all packets coming from the source network 192.168.15.0 with its own IP address.
$ iptables -t nat -A POSTROUTING -s 192.168.15.0/24 -j MASQUERADE
That way, anyone receiving these packets outside the network will think that they’re coming from the host and not from within the namespaces. When we try to ping now, we see that we are able to reach the outside world.
$ ip netns exec blue ping 192.168.1.3
Reaching the Internet from Namespaces
Finally, say the LAN is connected to the internet. We want the namespaces to reach the internet.
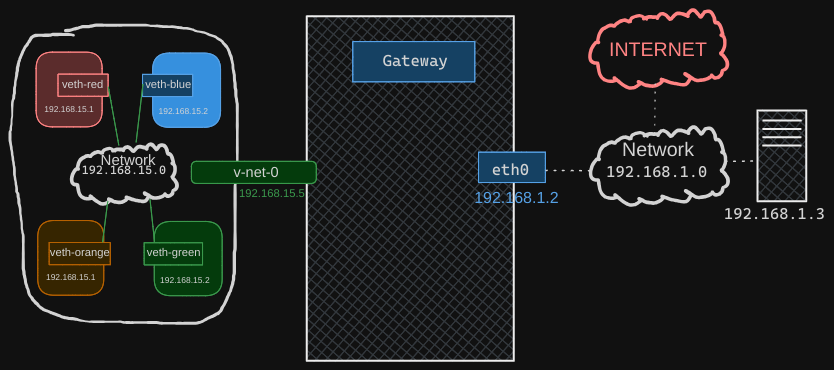
So, let’s try to ping a server on the internet at 8.8.8.8 from the blue namespace. We receive a similar message that the network is unreachable. By now, we know why that is. When we look at the routing table, we see that we have routes to the network 192.168.1 but not to anything else.
Since these namespaces can reach any network our host can reach, we can simply configure them to use our host as the gateway to reach any external network. To do this, we add a default gateway specifying our host.
Here’s how to add the default gateway:
$ ip netns exec blue ip route add default via 192.168.15.5
By doing this, we’re instructing the blue namespace to send all traffic destined for external networks to our host, which will then route it appropriately. We should now be able to reach the outside world from within these namespaces.
Connectivity from Outside World to Namespaces
Now, what about connectivity from the outside world to inside the namespaces? For example, suppose the blue namespace hosts a web application on Port 80. Currently, the namespaces are on an internal private network, and no one from the outside world knows about them. You can only access these namespaces from the host itself. If you try to ping the private IP of the namespace from another host on a different network, you’ll find that it’s not reachable because that host doesn’t know about this private network.
To make this communication possible, you have two options, as discussed in the previous post:
Add an IP route entry to the second host: This involves telling the second host that the network 192.168.15 can be reached through the host at 192.168.1.2. However, this method involves exposing the identity of the private network, which we want to avoid.
Port forwarding using IP tables: This option involves adding a port forwarding rule using IP tables. This rule will forward any traffic coming to Port 80 on the local host to Port 80 on the IP assigned to the blue namespace.
Here’s an example of how to set up port forwarding:
# Enable IP forwarding
$ sudo sysctl -w net.ipv4.ip_forward=1

# Add port forwarding rule
$ sudo iptables -t nat -A PREROUTING -p tcp --dport 80 -j DNAT --to-destination 192.168.15.2:80

# Allow forwarding
$ sudo iptables -A FORWARD -p tcp -d 192.168.15.2 --dport 80 -m state --state NEW,ESTABLISHED,RELATED -j ACCEPT
With this setup, external hosts can reach the web application in the blue namespace by accessing the local host’s IP address on Port 80. This method keeps the private network hidden while allowing external access to the services hosted within the namespaces.